Showing posts with label cheap radio triggers. Show all posts

Tuesday, 2 December 2014

Creating a sunny window light in winter

Keith Robins Photography shares a solution to the problem of how to create a suuny aspect to his interior kitchen window cill when it's fairly dismal outside with low cloud cover, it's late in the day and late in the year. This is how his cat, Socks, looks using just daylight.
 So how exactly does he go about this task? Using a flashgun or two of course!
First off is calculating the exposure for what avalable light there is. Selecting a shutter speed of 1/200th to avoid shake, then choose the maximum aperture of F4, after all it is pretty dim out there and detail of the garden wall is required. Well, not really but we'll pretend that it is. 
As the results were way too dark at ISO 200 we decided on 1250 ISO as noise is not too much of an issue with a Canon 70D and Lightroom and the results don't look too bad, but by adding a flashgun we could do better.

   Now to create the sunlight. A flashgun is attached to a tall light stand in the backyard and a CTO (Colour Temperature Orange) filter is placed over the flash lens to warm up the light.
With the flash aimed at the kitchen window to be our pretend sunlight we'll retreat indoors and see how it looks in camera. To bright so we reduce the power setting to 1/2.

  The white balance is left on the flash setting on the camera which creates a very pleasant warm glow.
Adjusting our outdoor flash power to match ISO 1250 at F4 produces the resulting image below and looks a lot more natural, just like a summer's day!
 
However, the rest of our kitchen now seems a little dark compared to the new sunlight coming through the window, so a second flash is aimed at the ceiling well away from the window to make it seem as if the sunlight is strong enough to bounce around the room, which it would do in reality. We now need to find the cat again who by this time is settling into his basket and by pointing out the birds sat on the garden wall Socks is quite happy pose for another portrait.
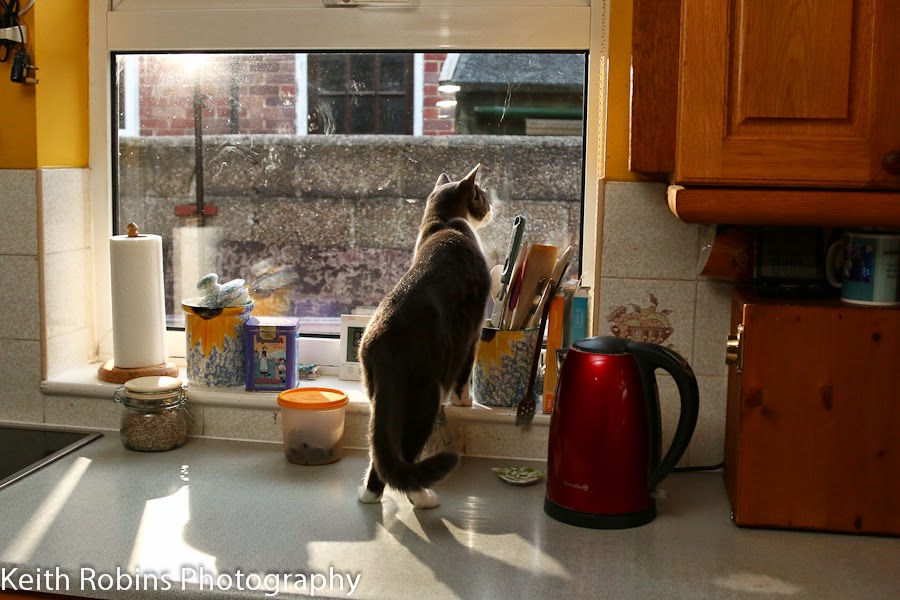
A rather pleasing shot of 'Socks' peering through a kitchen window results from a bit of planning and a few items which most serious photographers have in their kit bag.

Both flashguns are operating on iShoot radio triggers from China at £55 for three triggers and a transmitter. A setting of 1/128th power is all that is required for the indoor flash and 1/2 power for the outside one. The signal for these radio trigger will bounce around a room in every direction and rarely cause a misfire. but outdoors they only work line of sight up to 50 metres easily. The outdoor trigger is hidden by the flashgun body so a small piece of silver foil is attached to bounce the radio signal at the trigger.

For those who have two sets of radio triggers ti's possible to join a receiver and transmitter together and place this combination in a position where it's visible from both camera and hidden trigger.
 Alternatively, a Yognou flashgun would be an option as they have an optical triggering system built-in, but again it has to be line of sight and a third flash on a radio trigger might be required to fire the outside flash.

All in all a very rewarding thirty minutes playing with flash.

Wednesday, 29 October 2014

How to shoot sports silhouettes with Keith Robins Photography. 
 A white backdrop is good, across the floor by ten feet is even better. A single softbox fires from one side at 45 degrees to the backdrop so the light bounces off harmlessly to the far side and doesn't weaken the blackness. Okay, so this is not exactly even lighting but I'm trying to demonstrate how to do these type of shots simpley, easy, cheaply.
 This football shot takes more time than any of the others. Maybe Tann isn't a real sports fan at school - the ball shoots off at so many different angles. Yeah, yeah, I know I could photoshop the ball anywhere I like but that's not the idea here. These are all via Lightroom 3.6 which is old, cheap, simple etc.
Besides, my photoshop is on the blink, I will knuckle down to clearing out my Lightroom files as I'm suspecting the old Lightroom will vanish as soon as I sign up to Adobe CC and I'm not going to even think about what happens then. I never have managed to find where Lightroom saves when it backs up.
 Okay, so decorating may not be strictly a sport but DIY is high on the list of popular hobbies along with gardening, fisning and photography, plus I have all the painting kit in my van.
 Even the roller and the drill below are often in the van - I'm a builder / repairman.

I reckon a chair adds more impact than a traditional pair of steps, besides I don't have a pair in the van.
I hope you dodn't realize that Tann is adjusting a lighting stand, it should be a pipe, but hey, who's to know?
This climbing image really needs a rockface but my imagination is working overtime on this shoot due to a cappuccino being stronger than my normally drinking just hot water, sometimes with a tiny splash of orange squash.
Just to make thing more challenging I add a second flash with a grid to narrow the light down to just Tann's face, plus I shoot in colour as Tann, my model for the morning, wants to create a set of 'normal' photos for her Facebook page.
It was from these that the pure soot and whitewash silhouettes originate with the help of Lightroom.
Pushing the contrast way up, the brightness right up, blacks far over, plus an adjustment brush with plenty of contrast, etc. Oh, and saturation gets pushed down low as a little purple is creeping in here and there. 

Creating these silhouettes has been a rewarding exercise alround and there are so many variants yet to shoot, but using the right lighting in the first place helps a lot in seeing what the camera sees, plus I definitely needed a little help from Lightroom and it's, 'Job done!'

Saturday, 28 July 2012

Latest news from Keith Robins

It's been ages since my last blog post here but Keith Robins Photography is still around and busier than ever. For instance, I recently surprised myself and managed ten on-location portait photoshoots in eight days besides working a fifty hour week in my plumbing business.
Now I've turned 67 it should be time to relax and put my feet up. But, as luck would have it, my long term hobby is photographing young ladies so I've brushed the dust off my camera, charged up a few batteries and taken a few on-location photo trips into the countrtside. River shoots seem to feature quite highly in the requests from young feminine beauties closely followed by 'on-the-rocks' at the seaside. If this is what retirement is all about - bring it on!


  I'm not sure how or why but Facebook was kind enough to give me a private page plus a business page, which I don't mind at all as it gives me a couple of options when I upload the results from these exciting photo sessions. Okay, so Facebook resizes all the images for me automatically, which helps make them less desirable to rip-off merchants, plus there is plenty of space for loads and loads of albums. This in turn has attracted quite a few viewers and resulted in new models contacting me ref photoshoots.


    I normally work on a TFCD basis which means I give some of my time and skill, the model gives her time and good looks. The model gets a set of CD images and we both end up improving our portfolios.
    Now, this might sound as if I'm losing out on a load of cash. But actually it's the very opposite - I'm saving myself money! What's happening is that I am now meeting some really attractive models, my persona and techniques have changed for the better. Plus, I consider myself a much better photographer and my skills level has shot through the roof.


   I'm now in a position where I could start charging for my skills because I can physically prove that I'm the photographer who is capable of producing stunning results.  Similar in a way, I suppose, to a brilliant violinist going on the X factor and winning and all his neighbours saying, 'Well I didn't know he could play like that!'
You have to show what you can do, how good you are and only then will Joe Public beat a path to your door. I look on Facebook as being my shop window, plus they even tell friends of friends how good you are - and it's all free!!!!
     I'm gradually putting a two or three results from each of my most recent photography shoots, along with a write-up, on to my Facebook page at:-   www.facebook.com/keithrobinsphotography
I also run a blog based website at:- http://www.keithrobinsphotography.co.uk
    Meanwhile, seeing as I'm now drawing a pension and my customers won't let me retire in peace, what's the point in charging loads of money and then paying income tax on all of it? Or am I sonehow missing the point?
 

Tuesday, 29 November 2011

Just been on a 'Subtraction of Light' course with Mark Cleghorn of PhotoTraining4U fame in Cardiff.
Seems like the addition of flash is not quite as necessary as I'd previously thought.
In fact, during the five day course we were starting at 6am and photographing with extended exposures of up to two minutes. On a pier in low lying mist by 10am and then later we went under the pier to discover the equivalent of studio lighting!
Mark's 'Subtraction of Light' course has changed my whole outlook on how I take portraits with the purchase of a Canon 85mm F1.8 lens. I've also begun using the 'Picture Style' modes on my Canon 5D with black and white plus a red filter being my favourite.
Candid photography has never been one of my favourite pastimes, but it is growing on me. Street portraits however, turned ot to be far more rewarding than anything I've previouly tackled with many new contacts each time I take to the streets.
Portraits in the woods now makes me look for 'window light' and a reflector is higher on my list of accessories than a tripod ever was.
But don't worry I'm going to forgo the benefits of using a flashgun.
I'll try to keep you posted on a more regular basis with plenty of results form my YeoPhotoGroup course which now takes place on a Tuesday evening. This is a free range group with no charges, no officialdom and no real rules apart from the basis of, 'We all help each other to enjoy our photography and don't give any negative comments'.
We now have a facebook area and regularly post results, ideas, and hints.
Keith.


Monday, 2 May 2011

Miniscule portrait studio at 1.5 m by 1 metre!
A narrow shop doorway, model four feet away and a single off-camera flashgun bounced off a four inch wide doorframe is all Keith Robins Photography needs to create a superb portrait.
Okay so there is a bit of help from the sun which illuminates Lola's left cheek via the white wall outside. For some of these photos I use my Canon 580 EX with the head reversed and bouncing it off a white tee shirt to my left. The flash is set on ETTL while the camera stays on manual, enabling me to control the daylight to a precise exposure.
Getting Lola to look towards the somewhat darker shop interior helps to open up her eyes and as we all know, it's the eyes that can make or break a good portrait.

I came across Lola a week ago via 'Model Mayhem', a sort of online modeling agency where you sign up, wait for approval and eventually if they think you're good enough you can send out friend requests followed by email contacts with the models where MM act as intermediaries, a sort of buffer zone.
Lola is a newbie to the site as a model but I've had nearly forty years behind my camera as a portrait photographer and i've decided that her portfolio needs a boost, come to think of it so does mine! Besides, not only do I need the practice but, I can't remember ever having photographed a girl with such beautiful red hair or such incredible blue eyes. Mostly, though, I could see the possibilities of some amazing photos with Lola and on this count I think I am definitely about to be proved correct.


We arrange to meet at a carpark in Glastonbury on May 1st and blow me most of the roads are closed due to a series of bank holiday fun runs, the carpark is full but I somehow manage to squeeze in. Lola's mum has come along to help hold one of the flashguns as I can only carry one lighting stand along with all the other stuff us photographers consider important - so why do we never use it all?
I often carry two large bags and pull a kitchen waste bin on a shopping trolley full of lighting stands, brollies, reflectors and tripod, but this time it is just a bagful of four flashes, stand adaptors and triggers.


'Proper Job' supermarket carpark provides a small area of shade under a tree set in the pavement which I use to keep the brilliant sun off Lola's gorgeous red hair - I wanted to create my own strobist lighting arrangements, my own sunlight if you like.
One stand, a Vivitar 285 into a small brolly, a second 285 is held by mum replicated the sun to great effect. Both guns are firing via cheapo radio triggers from China at £60 for a set of three recievers and one transmitter. The benefits are that Lola's blue eyes opened up as she looked into the shade. What appears to be sunlight shining on Lola's cheek is really a Vivitar at 1/2 power, but without a modifier it resembles direct sunlight. The second 285 is bouncing into the small brolly also set to 1/2 power, but due to it bouncing into a brolly this is reduced to around 1/4 power and the biggest benefit is that it's really soft due to the close proximity - about three feet.
You wouldn't think that a carpark would make any sort of decent backdrop but it does. Not having access to a studio should not put you off taking beautiful portraits like these, it is possible almost anywhere to create a work of art using flag lights. Strobism rules!
Then we move on to a narrow shop doorway where Lola faces into the fairly dark interior with a weedy backyard and a whole mess of rainwater pipes in the background lit by sunlight.
Okay, so I didn't stay true strobist with the Vivtars for this part of the photoshoot as I want to push my understanding of the capabilities of Canon ETTL and whether I can still influence this modern automatic lighting technology, or, does it take over and mess up everything creative. To which the answer is - without my strobist knowledge of how to juggle exposure controls these photos of Lola will suffer big time.
Canon's interactive ETTL with more than one flash is now moving further down the list of things to absorb my precious time!
During the two hour shoot I take 115 photos, (eighty-five after editing), which Lola will get on a CD to go on her Facebook page, also on to her MM portfolio. I'm only too pleased to help this delightful young lady on her way as a model who is a joy to work with.
Will I use Model Mayhem again? Yes, without a doubt! Although it's a rather long winded method of contacting suitable models but it's for their protection and I can see why it has to be this way.
Will I be photographing Lola again? Yes, most definitely, can't wait!!!!

Tuesday, 25 May 2010

How Keith Robins Photography takes portraits outdoors in the dark!
You'd be forgiven for thinking these portraits were taken in a studio - whereas actually they were amid the bluebells of Sparkford woods around dusk, plus another two hours beyond.

Here's Bob, one of YPG's newer members, studying the results of his experimenting with a fibre optic ring flash while the main studio light is set off via my radio trigger. Okay, so I should have made more of the gorgeous bluebells, but I've been there, done that. Besides, portraits are my favourite area of photography.


Running a studio light away from any mains electricity is usually extremely expensive. Not anymore! Maplins sell a 1,000 watt inverter for less than £100
This picture of Charlotte was powered by a 12volt car battery, through a maplin invertor and has no trouble powering a single Elinchrom 200watt D-Lite2.
A Kenro five-in-one reflector helped lighten the shadows and eliminated the need for a second Elinchrom head. The Elinchrom D-lite2 heads have a 4 amp drain but it is only for 0.7 of a second so the 1,000watt inverter doesn't quite reach the stage where the power safety switch cuts out.


Laura, who's never done any sitting in front of a camera before, came along too and with a little verbal encouragement enabled us to capture this lovely semi black and white photo. I said that her eyes were one of her more attractive features and that I'd try to show them at their best.
I love playing around in photoshop and creating these semi black and whites with a softness produced via Guassian blur along with a layer mask.
For instance this one of Laura has a blurred copy layer, but the semi black and white effect is the result of leaving the blur at 50% then highlighting the lower layer and using the Mono button of Colour Mixer in CS2.

I love the way Emily's face is illuminated from a long way around to the left and only creates a small nose shadow in the shot on the left, plus how she's looking straight up at the large white reflective brolly. Shoot-thro brollies seem to lose a lot of power by not reflecting all the light so I'm really glad I snapped up this large bargain of a reflective brolly at a photo sale for £15.
Meanwhile, the nose shadow across Charlotte's cheek doesn't look right here and I should have asked her to tilt her head to the opposite side.
However, I still like the colour, the softness and especially the twinkle in her eye. Notice how the reflector casts a faint catchlight in her left eye?


My favourite shot of the evening is this one of Emily with it's superb soft lighting, a smile that's not over the top, a good sized catchlight in both eyes, plus the way her tumbling hair surrounds her face adding even more beauty to the finished photo.
Bluebells? What bluebells? They were there in the background, promise! I'm more than happy with these results and look forward to the next time with this trio of amazing girls.
Keith Robins.

Wednesday, 31 March 2010

Keith Robins Photography goes flashing at the seaside! Balancing daylight and flash is not the easiest of challenges, in fact less than five percent of photographers really understand how and why flashguns work in conjunction with available light.
This blog is a mine of information about exactly that.
I'm hoping that by reading all the posts in this blog that you too will be able to handle this most creative of lighting combinations and all you'll have spent is a little time.

Burton Bradstock in early March at around 5pm is the first photo. A flash on that rock in the foreground would have given added interest and help balance the picture.
Second photo is about an hour later. I definitely should have used a flash here - set on minus 2/3rds of a stop so it is not at all obvious - which is surely the whole point of this exercise. Must clean that front filter more often!
It's getting damned cold and my trouser legs are wet through kneeling in the wet shingle with a wide angle lens. Next time I'll bring a pair of wellies, or better still a pair of fisherman's waders.
Brian is seen here struggling with the principles of daylight flash balancing, but he's a fast learner and is soon able to take pictures just like these.

I used F18 at 1/160th on 200 ISO with my canon 550EX on ETTL. Strange to say that the camera, a Canon 5D, was in the manual mode - so too was the lens which is focused on Brian.
Even though the camera is in manual mode it does not effect the ability of the flash to operate successfully in ETTL.
Why manual mode for the camera? I wanted complete control over both aperture to control the flash, plus shutter speed which governs the intensity of the daylight. Now I can make the sky as dark and threatening as I like, mean while retaining a good exposure of my maim subject - usually a figure or a portrait.

This goes against the normal everyday trend of photography where one speed up equals one aperture down to get a similar exposure.
I feel completely at ease with flashguns and this rather unusual way of operating the settings on my camera and flash and have done so for over thirty years. Some of my old manual flashes needed light modifiers such as the lenses from a pair of old Polaroid sunglasses, several layers of handkerchief, or just a thumb placed in front of the flash lens. Nowadays there are auto modes via so many menus it's baffling, plus these modern things seem to have a mind of their own and often refuse to co-operate.
The copyright was added with one click of a brush and then toned down using Opacity.
Hold down the Alt key and type 0169 in the right-hand numerical keys to get a C symbol. type your name - select it with a rectangle - go to Edit, Define Brush Preset, click OK and your logo is the very last brush in the brush palette. Open a new layer before adding your logo, then use Transform to adjust or rotate.

Saturday, 31 October 2009

One radio transmitter and three triggers for £40. What a bargain for Keith Robins Photography!
Amazon is the place to visit for a fast efficient service. I ordered the triggers on Wednesday and, even though there was a Post Office strike in action, the packet was delivered on Friday. the Vivitar 285HV flashgun which I ordered the same day came a couple days later, well packed and in good nick. Thank you to the postmen for what I term a pretty good service in your hour of strife.
How do the triggers handle in use? Brilliantly!
The normal place for a radio transmitter is in the hotshoe along with a trigger mounted beneath a remote flashgun - this arrangement fired one of my Vivitar 285HV's at up to 50 metres, a lot further than the advertised 30 mtrs. I was more than pleased with this result.

For the next test I added an optical slave into the chain, just to explore the limitations. One Vivitar on the camera, then at 30 metres distance the radio transmitter was slotted into an £8 optical slave, a second 285HV was then slotted into one of the three triggers and placed an additional 30 metres from camera. The equipment all works together just fine, which is fantastic!

Next, I wanted to know whether a flash in ETTL mode would operate the remote flash. I placed a Canon 550EX in ETTL mode on top of a Canon 5D, which in turn was set to manual. The optical slave was connected directly to the Vivitar 285H. This system failed miserably!
A flashgun in ETTL mode, or a pop-up flash, sends out a small pre-flash before the shutter opens to calculate the strength of flash exposure needed to light the main subject. Of course this pre-flash will also set off the remote flashgun operated via an optical slave unit before the shutter is open. When the main light fires a few milliseconds later it's too late for your remote flash as it has already gone off and is still in the process of recharging.

Maybe this is why some photographers, new to the world of flashguns can easily be lead into thinking that multiple flash is beyond them, especially as their images consistently portray dead flat lighting from the on-camera flash.

Fear not, there is a way around this most irksome problem!
You may have noticed that when taking a photo a half press on the shutter button causes focusing / exposure info to pop up on screen for about 15 seconds.
The trick with using an ETTL flash as a master to fire remote flashes on radio triggers is to half press the shutter button to bring up this information, then press the star button which fires the tiny pre-flash along with the remote slave flash. Meanwhile the shutter is still closed.
Now wait about 10 seconds, but no longer than 14 seconds, before fully pressing the shutter button to take the photo proper. If you're using newish batteries this should be long enough for the remote flash to recharge and both guns will now fire while the shutter is open and give whatever power you have set on them.

However, when the on-camera flash is set to manual there is no pre-flash and both guns will fire as one light without any trouble.
I also tried using aperture priority and it worked great.
Carrying out the same test using shutter priority I found that the Canon 5D limited the speed to 1/200th with the end result coming out spot on.
All this exploration took several hours and I'll need to repeat this type of testing a few more times before it sinks in - remember I'm new to ETTL and the Canon 5D as maual flash has been my staple diet since the early seventies.
Hope this is some help in your flahs photography - Keith Robins.