Tuesday 2 December 2014

Creating a sunny window light in winter

Keith Robins Photography shares a solution to the problem of how to create a suuny aspect to his interior kitchen window cill when it's fairly dismal outside with low cloud cover, it's late in the day and late in the year. This is how his cat, Socks, looks using just daylight.
 So how exactly does he go about this task? Using a flashgun or two of course!
First off is calculating the exposure for what avalable light there is. Selecting a shutter speed of 1/200th to avoid shake, then choose the maximum aperture of F4, after all it is pretty dim out there and detail of the garden wall is required. Well, not really but we'll pretend that it is. 
As the results were way too dark at ISO 200 we decided on 1250 ISO as noise is not too much of an issue with a Canon 70D and Lightroom and the results don't look too bad, but by adding a flashgun we could do better.

   Now to create the sunlight. A flashgun is attached to a tall light stand in the backyard and a CTO (Colour Temperature Orange) filter is placed 
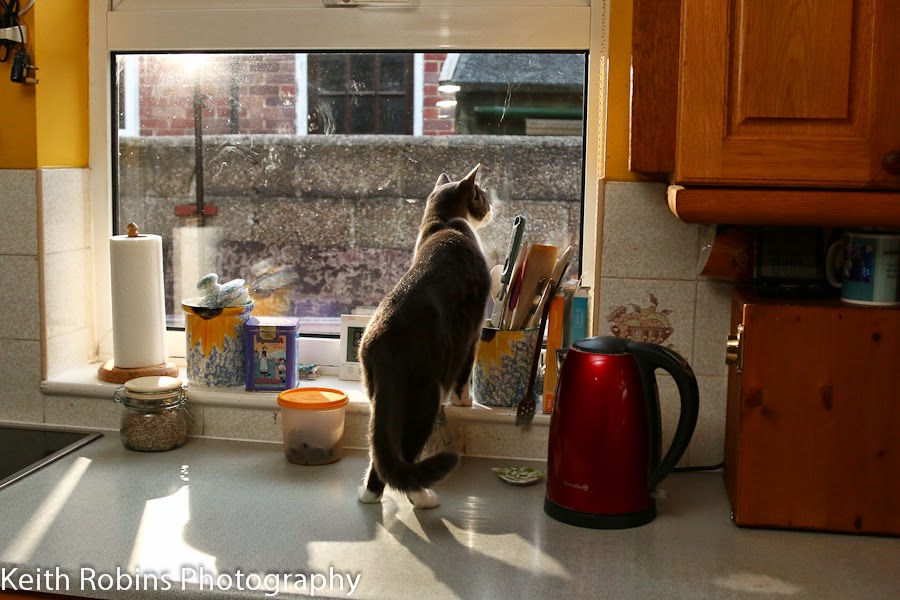
over the flash lens to warm up the light.
With the flash aimed at the kitchen window to be our pretend sunlight we'll retreat indoors and see how it looks in camera. To bright so we reduce the power setting to 1/2.

  The white balance is left on the flash setting on the camera which creates a very pleasant warm glow.
Adjusting our outdoor flash power to match ISO 1250 at F4 produces the resulting image below and looks a lot more natural, just like a summer's day!
 
However, the rest of our kitchen now seems a little dark compared to the new sunlight coming through the window, so a second flash is aimed at the ceiling well away from the window to make it seem as if the sunlight is strong enough to bounce around the room, which it would do in reality. We now need to find the cat again who by this time is settling into his basket and by pointing out the birds sat on the garden wall Socks is quite happy pose for another portrait.
A rather pleasing shot of 'Socks' peering through a kitchen window results from a bit of planning and a few items which most serious photographers have in their kit bag.

Both flashguns are operating on iShoot radio triggers from China at £55 for three triggers and a transmitter. A setting of 1/128th power is all that is required for the indoor flash and 1/2 power for the outside one. The signal for these radio trigger will bounce around a room in every direction and rarely cause a misfire. but outdoors they only work line of sight up to 50 metres easily. The outdoor trigger is hidden by the flashgun body so a small piece of silver foil is attached to bounce the radio signal at the trigger.

For those who have two sets of radio triggers ti's possible to join a receiver and transmitter together and place this combination in a position where it's visible from both camera and hidden trigger.
 Alternatively, a Yognou flashgun would be an option as they have an optical triggering system built-in, but again it has to be line of sight and a third flash on a radio trigger might be required to fire the outside flash.

All in all a very rewarding thirty minutes playing with flash.

Thursday 30 October 2014

How to shoot American cars via time exposure

Although late in the year Keith Robins Photography reveals how using a time exposure plus a high aperture brings out the strong colours and the beautiful shapes of iconic American cars at Poole Quay 2014.

Canon 70D set to completely to manual
F22 at 1/25th second, ISO 100
Sigma 10 / 20mm zoom at 14mm

White balance is set to the Kelvin scale  and adjusted to suit, almost every ten minutes as the sun is fading fast!


 Between 1/30th and 1/2 second DSLR cameras vibrate for a very short time as the mirror pops up and the first part of the shutter snaps across with 1/15th having the most shake.

To save my back muscles and to help reduce camera shake I'm using 'Live View', which also shows whether the colours, focus and composition are spot on.


 Manfrotto tripods are among the world's best and is my favourite go-to tripod for the sort of semi low speed photography I am anticipating at this annual event.
Yes it is heavy but having spent a lot on camera, lens, travelling 45 miles to be here I'm not going to waste it all on a lightweight shaker. Besides, if it gets too heavy the Manfrotos are meaty enough to drag behind me on a length of string. (Joking!)


 The times are gradually getting longer throughout the evening until the pink car below took 13 seconds to capture still at F22 and ISO 100.
Can't remember the Kelvin details exactly but the 'K' control definitely helps.


 Lightroom 3.6 might be old hat now but it's so much quicker than putting all the Jpegs through Photoshop.
Did I say Jpegs then? I always use Jpegs, have done for the last ten years which amounts to over half a million photos.
However, with maximum quality in mind I decide to shoot in Raw + large Jpegs just in case. 
Damned good job I did both as Lightroom 3.6 does not deal in Raw images from my Canon 70D and refuses to upgrade.
Adobe CC here I come, not just because of this Raw issue although I will upgrade myself one day soon, but I've seen so many brilliant tutorials using the latest from Adobe that I'm temped beyond reason. So watch thsi space.

Wednesday 29 October 2014

How to shoot sports silhouettes with Keith Robins Photography. 
 A white backdrop is good, across the floor by ten feet is even better. A single softbox fires from one side at 45 degrees to the backdrop so the light bounces off harmlessly to the far side and doesn't weaken the blackness. Okay, so this is not exactly even lighting but I'm trying to demonstrate how to do these type of shots simpley, easy, cheaply.
 This football shot takes more time than any of the others. Maybe Tann isn't a real sports fan at school - the ball shoots off at so many different angles. Yeah, yeah, I know I could photoshop the ball anywhere I like but that's not the idea here. These are all via Lightroom 3.6 which is old, cheap, simple etc.
Besides, my photoshop is on the blink, I will knuckle down to clearing out my Lightroom files as I'm suspecting the old Lightroom will vanish as soon as I sign up to Adobe CC and I'm not going to even think about what happens then. I never have managed to find where Lightroom saves when it backs up.
 Okay, so decorating may not be strictly a sport but DIY is high on the list of popular hobbies along with gardening, fisning and photography, plus I have all the painting kit in my van.
 Even the roller and the drill below are often in the van - I'm a builder / repairman.

I reckon a chair adds more impact than a traditional pair of steps, besides I don't have a pair in the van.
I hope you dodn't realize that Tann is adjusting a lighting stand, it should be a pipe, but hey, who's to know?
This climbing image really needs a rockface but my imagination is working overtime on this shoot due to a cappuccino being stronger than my normally drinking just hot water, sometimes with a tiny splash of orange squash.
Just to make thing more challenging I add a second flash with a grid to narrow the light down to just Tann's face, plus I shoot in colour as Tann, my model for the morning, wants to create a set of 'normal' photos for her Facebook page.
It was from these that the pure soot and whitewash silhouettes originate with the help of Lightroom.
Pushing the contrast way up, the brightness right up, blacks far over, plus an adjustment brush with plenty of contrast, etc. Oh, and saturation gets pushed down low as a little purple is creeping in here and there. 

Creating these silhouettes has been a rewarding exercise alround and there are so many variants yet to shoot, but using the right lighting in the first place helps a lot in seeing what the camera sees, plus I definitely needed a little help from Lightroom and it's, 'Job done!'

Sunday 9 March 2014

Is it me or are seaside photos fraught with accidents?
 Last night it was my radio trigger which sank without a trace.
The lighting stand was in two feet of water plus waves rolling in at 4 second intervals about 10 to 12 inches high. No great shakes you say, until an iShoot radio trigger slides off the hotshoe and drops into the sea!! While i'm trying to regain my composure and my balance I am watching the surface carefully looking for bubbles. If there's air inside then that has to come out before the sea can get in.
 
Spotted!! Twenty or so tiny bubbles indicate exactly where the trigger is. Roll up sleev, hold camera up away from the waves (yes I've been there done that!) and plunge a hand downward, only there's a hole right where the bubbles are.
I was tempted to shrug and accept the fate of the fourth trigger within twelve months to become functionless but another couple minutes grasping at the seabed and i'm shaking the water and sand out of my tiny piece of kit.
Take out the batteries and put it in front of the hot air on the way home.
 
This morning I look inside to see all the salt caking over some vital bit and decide to pop it in the sink for a wash and brush up. At the moment I'm still waiting for the receiver electronics to dry out and then I'll test it again (didn't work the first time I tried).
Out with all the other broken triggers and a bunch of tools and proceeded to repair / bodge three of the six into working items worthy of gracing a Bronica camera bag (well almost). So I'm back up to five triggers now.
Later on around sunset last night I stumble right next to the sea wall at Lyme Regis and my camera lens hits the stones rather hard. Luckily only the filter edge was dented and scratched but the threads are okay. Thank goodness I usually keep the filter attached, (I take it off when shooting into the sun to cut down on flare).
 
Hotshoes coming adrift where the screws pull out of the plastic are the result of most common accidents. Triggers snapping in half is second and battteries leaking are third in line for why flashguns don't go off when expected. There is a fourth problem - the flash only work a fraction of the time. Putting a new CR23a battery into the transmitter usually cures that one.