Showing posts with label multiple radio triggers. Show all posts

Tuesday, 2 December 2014

Creating a sunny window light in winter

Keith Robins Photography shares a solution to the problem of how to create a suuny aspect to his interior kitchen window cill when it's fairly dismal outside with low cloud cover, it's late in the day and late in the year. This is how his cat, Socks, looks using just daylight.
 So how exactly does he go about this task? Using a flashgun or two of course!
First off is calculating the exposure for what avalable light there is. Selecting a shutter speed of 1/200th to avoid shake, then choose the maximum aperture of F4, after all it is pretty dim out there and detail of the garden wall is required. Well, not really but we'll pretend that it is. 
As the results were way too dark at ISO 200 we decided on 1250 ISO as noise is not too much of an issue with a Canon 70D and Lightroom and the results don't look too bad, but by adding a flashgun we could do better.

   Now to create the sunlight. A flashgun is attached to a tall light stand in the backyard and a CTO (Colour Temperature Orange) filter is placed over the flash lens to warm up the light.
With the flash aimed at the kitchen window to be our pretend sunlight we'll retreat indoors and see how it looks in camera. To bright so we reduce the power setting to 1/2.

  The white balance is left on the flash setting on the camera which creates a very pleasant warm glow.
Adjusting our outdoor flash power to match ISO 1250 at F4 produces the resulting image below and looks a lot more natural, just like a summer's day!
 
However, the rest of our kitchen now seems a little dark compared to the new sunlight coming through the window, so a second flash is aimed at the ceiling well away from the window to make it seem as if the sunlight is strong enough to bounce around the room, which it would do in reality. We now need to find the cat again who by this time is settling into his basket and by pointing out the birds sat on the garden wall Socks is quite happy pose for another portrait.
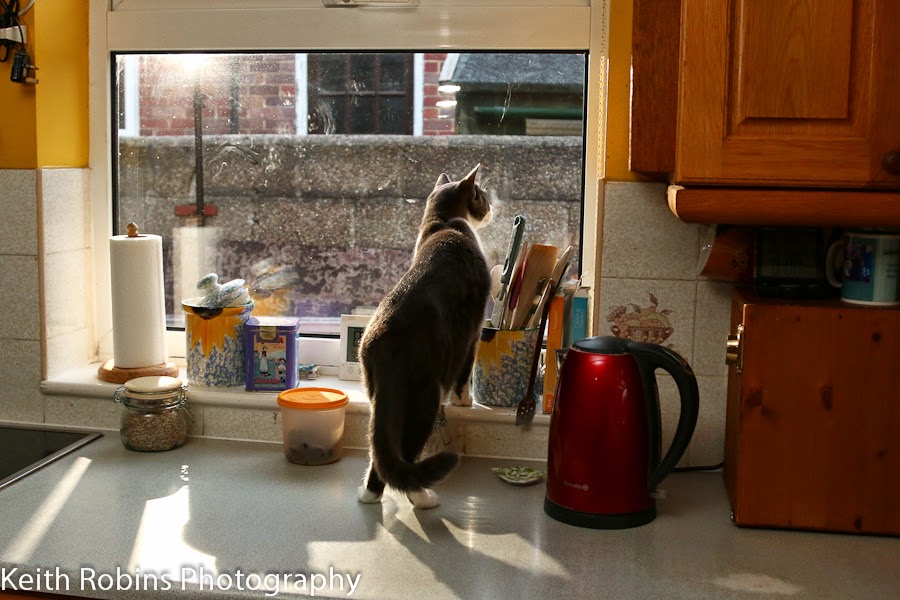
A rather pleasing shot of 'Socks' peering through a kitchen window results from a bit of planning and a few items which most serious photographers have in their kit bag.

Both flashguns are operating on iShoot radio triggers from China at £55 for three triggers and a transmitter. A setting of 1/128th power is all that is required for the indoor flash and 1/2 power for the outside one. The signal for these radio trigger will bounce around a room in every direction and rarely cause a misfire. but outdoors they only work line of sight up to 50 metres easily. The outdoor trigger is hidden by the flashgun body so a small piece of silver foil is attached to bounce the radio signal at the trigger.

For those who have two sets of radio triggers ti's possible to join a receiver and transmitter together and place this combination in a position where it's visible from both camera and hidden trigger.
 Alternatively, a Yognou flashgun would be an option as they have an optical triggering system built-in, but again it has to be line of sight and a third flash on a radio trigger might be required to fire the outside flash.

All in all a very rewarding thirty minutes playing with flash.

Sunday, 9 December 2012

Wow, what has Blogger done to their site since I was last on the scene? It's a work of art now to get up the 'New post' box.
Been so busy doing plumbing and building repairs , yet strangely I've also managed to squeeze in even more photography than ever before with around 4 to 8 photo shoots per week. Most of these have been portrait on location shoots in the woods, by the sea, on hill tops and up to my knees in rivers, plus several portrait sessions in the sea with waves lapping at my pockets. My flashguns and stands have always been with me as my passion for great lighting knows no bounds, even in the surf.

Tonii at WestBay obviously used no flash at all but this is one of the extremely rare moments when I used pure natural light.
Exposing for the brightest part of the sky involves noting the auto exposure settings and then closing down two stops as a starting point. Usually I leave the white balance set to 'Flash' as I prefer the warmer tones. Same too with night photography when I want the tungsten street lights to resemble tugnsten street lights.


Now let's have a look at Tonii in this dis-used wartime building with its gorgeous grafitti. Taken with two flashes, one front and back, with Tonii sandwiched between. I call this sandwich lighting for good reason, preferably with a softbox on the nearest flash while the far light has no modifier and is often wearing a DIY grid.
I quite liked the effect of flare from the rim light and decided to stick with it for the rest of this part of the shoot.


Two softboxes help blend the warm daylight into this image with almost no visible cut off point between the two light sources.
Tonii is so patient and is helpful beyond measure, Although she is never backward in saying if she doesn't like a particular shot, which gets deleted there and then.
So yes, I do show my models / helpers the images as they gradually develope into the finshed product.
The church is run byMichael, a good friend of mine, who says we can borrow it any time he's not using it. Must remember to give him a copy of some of the better images.

 In this shot of Danii leaping over a log in a local forest I wanted to keep the daylight as a blur, plus create a blur behind her. The choices are either go with a stanionary camera on a tripod and catch the blur of white material streaming out behind Danii and freeze her with second curtain flash. Or, I pan with her and get streaky daylight.
After a couple shots of each category an idea sprang to mind - what if I could manage both trains of thought in one shot. By arranging for Danii to be running towards the darker area and panning with her I could turn the camera faster, in the same direction, after the flash had gone off in first curtain sync. I hasten to add that I was using about 1/10 of a second. Also, by the third image, I realise that although I'm turning the camera faster I'm panning it a little too fast. Because the flash is the main illumination here then Danii is less likely to record against the blackness. Her front foot is moving fast enough not to record as a great deal of blur due to the flash, although I did have to go into Photoshop and take out a small amount of blur in that area.

Saturday, 31 October 2009

One radio transmitter and three triggers for £40. What a bargain for Keith Robins Photography!
Amazon is the place to visit for a fast efficient service. I ordered the triggers on Wednesday and, even though there was a Post Office strike in action, the packet was delivered on Friday. the Vivitar 285HV flashgun which I ordered the same day came a couple days later, well packed and in good nick. Thank you to the postmen for what I term a pretty good service in your hour of strife.
How do the triggers handle in use? Brilliantly!
The normal place for a radio transmitter is in the hotshoe along with a trigger mounted beneath a remote flashgun - this arrangement fired one of my Vivitar 285HV's at up to 50 metres, a lot further than the advertised 30 mtrs. I was more than pleased with this result.

For the next test I added an optical slave into the chain, just to explore the limitations. One Vivitar on the camera, then at 30 metres distance the radio transmitter was slotted into an £8 optical slave, a second 285HV was then slotted into one of the three triggers and placed an additional 30 metres from camera. The equipment all works together just fine, which is fantastic!

Next, I wanted to know whether a flash in ETTL mode would operate the remote flash. I placed a Canon 550EX in ETTL mode on top of a Canon 5D, which in turn was set to manual. The optical slave was connected directly to the Vivitar 285H. This system failed miserably!
A flashgun in ETTL mode, or a pop-up flash, sends out a small pre-flash before the shutter opens to calculate the strength of flash exposure needed to light the main subject. Of course this pre-flash will also set off the remote flashgun operated via an optical slave unit before the shutter is open. When the main light fires a few milliseconds later it's too late for your remote flash as it has already gone off and is still in the process of recharging.

Maybe this is why some photographers, new to the world of flashguns can easily be lead into thinking that multiple flash is beyond them, especially as their images consistently portray dead flat lighting from the on-camera flash.

Fear not, there is a way around this most irksome problem!
You may have noticed that when taking a photo a half press on the shutter button causes focusing / exposure info to pop up on screen for about 15 seconds.
The trick with using an ETTL flash as a master to fire remote flashes on radio triggers is to half press the shutter button to bring up this information, then press the star button which fires the tiny pre-flash along with the remote slave flash. Meanwhile the shutter is still closed.
Now wait about 10 seconds, but no longer than 14 seconds, before fully pressing the shutter button to take the photo proper. If you're using newish batteries this should be long enough for the remote flash to recharge and both guns will now fire while the shutter is open and give whatever power you have set on them.

However, when the on-camera flash is set to manual there is no pre-flash and both guns will fire as one light without any trouble.
I also tried using aperture priority and it worked great.
Carrying out the same test using shutter priority I found that the Canon 5D limited the speed to 1/200th with the end result coming out spot on.
All this exploration took several hours and I'll need to repeat this type of testing a few more times before it sinks in - remember I'm new to ETTL and the Canon 5D as maual flash has been my staple diet since the early seventies.
Hope this is some help in your flahs photography - Keith Robins.