Keith Robins Photography explores black glass reflections.
Glass will produce a reflection if the far side is dark and black is about as dark as it gets. Being a building repairman means I often have bit of glass lying around from windows, patio doors, or shower cubicles with the last two being toughened.
Cleaning one side of the glass is worth doing really well before spraying with black paint. We don't want any dust spots sealed between spray and glass.
Two coats is enough to give a longlasting scratch resistant finish. When dry, turn it over to reveal a perfectly smooth shiny black mirror that will be the base for my product photography for years to come.
Now let's find a few items to photograph. I choose a bottle and a large glass into which a plastic rose is placed, the last two are both painted with a matt white spray from B&Q a DIY retailer at £9
A scrap kitchen base unit mounted on a couple lengths of square plastic rainwater pipe instead of legs means I can slide the whole thing around my studio without effort, a larger than normal top gives a table sized area for my product/still life photography.
I lay the black glass on the tabletop and drape a black cloth beyond for a background.
To create a background support a pair of woodworking clamps are clipped on and 3 foot long plastic overflow pipe at 22mm diameter is slipped over the metal ends for uprights. On top are two 'Tee' joints. A length of 15mm copper pipe slids easily through the two tee joints and supports my black cloth background. It can also hold tracing paper, a bamboo curtain, a roll of white wallpaper, thin scrim, a Venetian blind, etc.
Camera on tripod set to F16 for a good depth of focus plus it gives me chance to wave a torch a at my subject. ISO 200 and 20 seconds seems to return a fair result. Two second timer so I can get into position, keep the torch at near enough the same distance and we have the first exposure in the bag.
Avoid getting the light onto the glass so it remains dark and the reflection is improved. Hold the torch low so it skates across the glass surface and illuminates the subject from low down. This will look better in the reflection.
The torch and arm can go between the lens and subject without disturbing the finished result.
I like to merge several exposure in edit and will concentrate on one major part of my setup at a time.
My light is an LED block from Maplins at £10 It takes four AA rechargeable batteries which last for weeks at a timeas a work light in my day job as a plumber working in cupboards and under kitchen sinks.
An alternative to black glass using a similar lighting technique.
Monday, 5 February 2018
Saturday, 25 March 2017
White on white tabletop is a challenge for Keith Robins Photography
With a roll of £3 wallpaper as a background, a recycled bottle from someone else's waste bin, a couple of glasses from a charity shop, plus a £7 can of white spray and a plastic rose the costs are hardly mounting up.
Now add a framework to support the wallpaper. Two long reach woodworking clamps, fixed to each end of the recycled kitchen unit used as a bench, have plastic overflow pipe slotted over them.
At the top of these are two Tee joints through which rests a length of metal tubing from an old shower curtain. This supports the wallpaper which is pulled out and secured with three large clips.
Lighting is from the 'Lighthouse' LED lamp which runs on a pair of AA batteries.
Out of an 8 second exposure I illuminated the background for two seconds stationary and then waved the light sideways to reduce the shadows coming forward.
This is my favourite shot out of twenty or so images.
This is the light I used.
Here is a slight variation on the method of lighting, mainly, waving the lamp up and down to create reflections.
I've also brewed up some tea for what I think Malibu looks like. To avoid scum and the cut down condensation I used cold water and merely floated a Red Bush teabag on top for three minutes.
With a roll of £3 wallpaper as a background, a recycled bottle from someone else's waste bin, a couple of glasses from a charity shop, plus a £7 can of white spray and a plastic rose the costs are hardly mounting up.
Now add a framework to support the wallpaper. Two long reach woodworking clamps, fixed to each end of the recycled kitchen unit used as a bench, have plastic overflow pipe slotted over them.
At the top of these are two Tee joints through which rests a length of metal tubing from an old shower curtain. This supports the wallpaper which is pulled out and secured with three large clips.
Lighting is from the 'Lighthouse' LED lamp which runs on a pair of AA batteries.
Out of an 8 second exposure I illuminated the background for two seconds stationary and then waved the light sideways to reduce the shadows coming forward.
This is my favourite shot out of twenty or so images.
This is the light I used.
Here is a slight variation on the method of lighting, mainly, waving the lamp up and down to create reflections.
I've also brewed up some tea for what I think Malibu looks like. To avoid scum and the cut down condensation I used cold water and merely floated a Red Bush teabag on top for three minutes.
Black on white tabletop photography using lightpainting.
Well, actually it's mixture of lightpainting and blending multiple exposures in Photoshop cc using black masks. Blending reveals small areas of additional photographs taken via long exposures while I wave a small torch around to either reduce shadows, cast extra shadows, produce highlights and reflections.
The yellow and black torch is from hardware stores under the name 'Lighthouse' and cost around £5.
The tiny black metal pocket torch runs on a single AA battery, emits a flash white balance compatible light which is unbelievably strong (150 plus lumens) and costs £5 from Screwfix.
The right-angle plastic plumbing fittings is from a toilet overflow and reduces the stark bright light to more of a usable glow. The idea is to hold this torch only a few inches from each of the items in turn, at such an angle that textures can be shown up and reflections gradually built up during, say a ten second exposure.
Well, actually it's mixture of lightpainting and blending multiple exposures in Photoshop cc using black masks. Blending reveals small areas of additional photographs taken via long exposures while I wave a small torch around to either reduce shadows, cast extra shadows, produce highlights and reflections.
The yellow and black torch is from hardware stores under the name 'Lighthouse' and cost around £5.
The tiny black metal pocket torch runs on a single AA battery, emits a flash white balance compatible light which is unbelievably strong (150 plus lumens) and costs £5 from Screwfix.
The right-angle plastic plumbing fittings is from a toilet overflow and reduces the stark bright light to more of a usable glow. The idea is to hold this torch only a few inches from each of the items in turn, at such an angle that textures can be shown up and reflections gradually built up during, say a ten second exposure.
Sunday, 11 December 2016
My new 50mm F1.8 lens doesn't focus in the dark.
Bought with bokeh Christmas lights behind a portrait in mind, the narrow band of focus shows up the slightest deviation from correct focus on the nearest eye.
I'm using flashguns to light my model and she is lit up beautifully, but, she's out of focus!
It seems the new Yongnuo 622 tx radio trigger have a transmitter that sends out an infra red gridde focusing aid. Before I bought a set I remember seeing a Canon ST-E2 lying around in my studio.
Sure enough it sends out an infra red focusing grid long enough for the lens to focus, then turns off automatically - Brilliant!!
Remote control of a Canon flash in most rooms, or even a large hall, is a doddle. Outside I need line of sight with 12 metres maximum reach, but with the flash in slave mode I can operate all the controls including high speed sync. Plus, I can fire several other flashes in two groups and have ratio control over both groups.
However, I have one Canon flash and three Yongnuo 560 flashes and although they will all fire there seems no way I can make the Yongnuo's fire in sync with the shutter.
The infra red beam fires off the Yongnuo's before the shutter has opened no matter which mode I use.
To be continued after the purchase of a set of Yongnuo 622tx radio triggers.
Bought with bokeh Christmas lights behind a portrait in mind, the narrow band of focus shows up the slightest deviation from correct focus on the nearest eye.
I'm using flashguns to light my model and she is lit up beautifully, but, she's out of focus!
It seems the new Yongnuo 622 tx radio trigger have a transmitter that sends out an infra red gridde focusing aid. Before I bought a set I remember seeing a Canon ST-E2 lying around in my studio.
Sure enough it sends out an infra red focusing grid long enough for the lens to focus, then turns off automatically - Brilliant!!
Remote control of a Canon flash in most rooms, or even a large hall, is a doddle. Outside I need line of sight with 12 metres maximum reach, but with the flash in slave mode I can operate all the controls including high speed sync. Plus, I can fire several other flashes in two groups and have ratio control over both groups.
However, I have one Canon flash and three Yongnuo 560 flashes and although they will all fire there seems no way I can make the Yongnuo's fire in sync with the shutter.
The infra red beam fires off the Yongnuo's before the shutter has opened no matter which mode I use.
To be continued after the purchase of a set of Yongnuo 622tx radio triggers.
Tuesday, 2 December 2014
Creating a sunny window light in winter
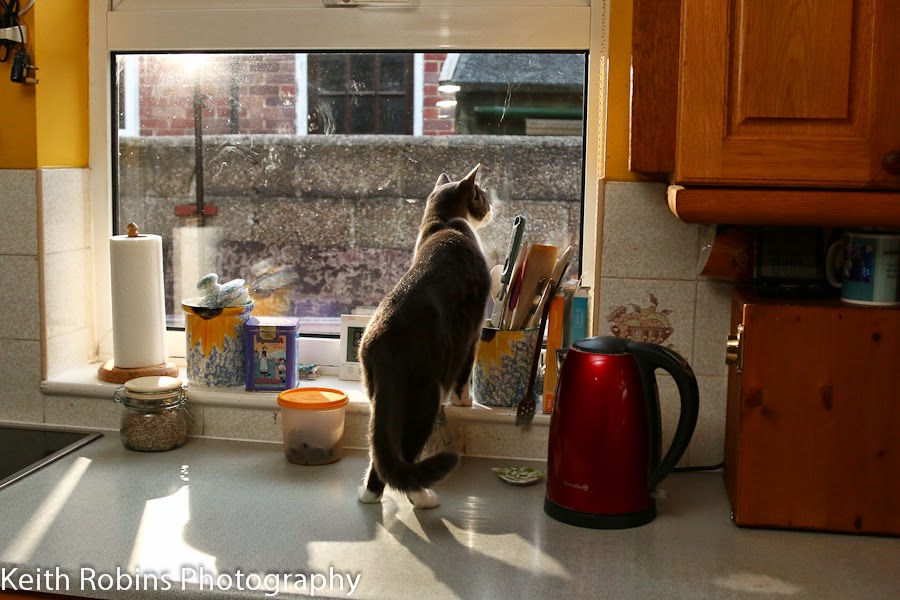
Keith Robins Photography shares a solution to the problem of how to create a suuny aspect to his interior kitchen window cill when it's fairly dismal outside with low cloud cover, it's late in the day and late in the year. This is how his cat, Socks, looks using just daylight.
So how exactly does he go about this task? Using a flashgun or two of course!
First off is calculating the exposure for what avalable light there is. Selecting a shutter speed of 1/200th to avoid shake, then choose the maximum aperture of F4, after all it is pretty dim out there and detail of the garden wall is required. Well, not really but we'll pretend that it is.
As the results were way too dark at ISO 200 we decided on 1250 ISO as noise is not too much of an issue with a Canon 70D and Lightroom and the results don't look too bad, but by adding a flashgun we could do better.
Now to create the sunlight. A flashgun is attached to a tall light stand
in the backyard and a CTO (Colour Temperature Orange) filter is placed
over the flash lens to warm up the light.
With the flash aimed at the kitchen window to be our pretend sunlight we'll retreat indoors and see how it looks in camera. To bright so we reduce the power setting to 1/2.
The white balance is left on the flash setting on the camera which creates a very pleasant warm glow.
Adjusting our outdoor flash power to match ISO 1250 at F4 produces the resulting image below and looks a lot more natural, just like a summer's day!
However, the rest of our kitchen now seems a little dark compared to the new sunlight coming through the window, so a second flash is aimed at the ceiling well away from the window to make it seem as if the sunlight is strong enough to bounce around the room, which it would do in reality. We now need to find the cat again who by this time is settling into his basket and by pointing out the birds sat on the garden wall Socks is quite happy pose for another portrait.
A rather pleasing shot of 'Socks' peering through a kitchen window results from a bit of planning and a few items which most serious photographers have in their kit bag.
Both flashguns are operating on iShoot radio triggers from China at £55 for three triggers and a transmitter. A setting of 1/128th power is all that is required for the indoor flash and 1/2 power for the outside one. The signal for these radio trigger will bounce around a room in every direction and rarely cause a misfire. but outdoors they only work line of sight up to 50 metres easily. The outdoor trigger is hidden by the flashgun body so a small piece of silver foil is attached to bounce the radio signal at the trigger.
For those who have two sets of radio triggers ti's possible to join a receiver and transmitter together and place this combination in a position where it's visible from both camera and hidden trigger.
Alternatively, a Yognou flashgun would be an option as they have an optical triggering system built-in, but again it has to be line of sight and a third flash on a radio trigger might be required to fire the outside flash.
All in all a very rewarding thirty minutes playing with flash.
So how exactly does he go about this task? Using a flashgun or two of course!
First off is calculating the exposure for what avalable light there is. Selecting a shutter speed of 1/200th to avoid shake, then choose the maximum aperture of F4, after all it is pretty dim out there and detail of the garden wall is required. Well, not really but we'll pretend that it is.
As the results were way too dark at ISO 200 we decided on 1250 ISO as noise is not too much of an issue with a Canon 70D and Lightroom and the results don't look too bad, but by adding a flashgun we could do better.
With the flash aimed at the kitchen window to be our pretend sunlight we'll retreat indoors and see how it looks in camera. To bright so we reduce the power setting to 1/2.
The white balance is left on the flash setting on the camera which creates a very pleasant warm glow.
Adjusting our outdoor flash power to match ISO 1250 at F4 produces the resulting image below and looks a lot more natural, just like a summer's day!
However, the rest of our kitchen now seems a little dark compared to the new sunlight coming through the window, so a second flash is aimed at the ceiling well away from the window to make it seem as if the sunlight is strong enough to bounce around the room, which it would do in reality. We now need to find the cat again who by this time is settling into his basket and by pointing out the birds sat on the garden wall Socks is quite happy pose for another portrait.
A rather pleasing shot of 'Socks' peering through a kitchen window results from a bit of planning and a few items which most serious photographers have in their kit bag.
Both flashguns are operating on iShoot radio triggers from China at £55 for three triggers and a transmitter. A setting of 1/128th power is all that is required for the indoor flash and 1/2 power for the outside one. The signal for these radio trigger will bounce around a room in every direction and rarely cause a misfire. but outdoors they only work line of sight up to 50 metres easily. The outdoor trigger is hidden by the flashgun body so a small piece of silver foil is attached to bounce the radio signal at the trigger.
For those who have two sets of radio triggers ti's possible to join a receiver and transmitter together and place this combination in a position where it's visible from both camera and hidden trigger.
Alternatively, a Yognou flashgun would be an option as they have an optical triggering system built-in, but again it has to be line of sight and a third flash on a radio trigger might be required to fire the outside flash.
All in all a very rewarding thirty minutes playing with flash.
Thursday, 30 October 2014
How to shoot American cars via time exposure
Although late in the year Keith Robins Photography reveals how using a time exposure plus a high aperture brings out the strong colours and the beautiful shapes of iconic American cars at Poole Quay 2014.
Canon 70D set to completely to manual
F22 at 1/25th second, ISO 100
Sigma 10 / 20mm zoom at 14mm
White balance is set to the Kelvin scale and adjusted to suit, almost every ten minutes as the sun is fading fast!
Between 1/30th and 1/2 second DSLR cameras vibrate for a very short time as the mirror pops up and the first part of the shutter snaps across with 1/15th having the most shake.
To save my back muscles and to help reduce camera shake I'm using 'Live View', which also shows whether the colours, focus and composition are spot on.
Manfrotto tripods are among the world's best and is my favourite go-to tripod for the sort of semi low speed photography I am anticipating at this annual event.
Yes it is heavy but having spent a lot on camera, lens, travelling 45 miles to be here I'm not going to waste it all on a lightweight shaker. Besides, if it gets too heavy the Manfrotos are meaty enough to drag behind me on a length of string. (Joking!)
The times are gradually getting longer throughout the evening until the pink car below took 13 seconds to capture still at F22 and ISO 100.
Can't remember the Kelvin details exactly but the 'K' control definitely helps.
Lightroom 3.6 might be old hat now but it's so much quicker than putting all the Jpegs through Photoshop.
Did I say Jpegs then? I always use Jpegs, have done for the last ten years which amounts to over half a million photos.
However, with maximum quality in mind I decide to shoot in Raw + large Jpegs just in case.
Damned good job I did both as Lightroom 3.6 does not deal in Raw images from my Canon 70D and refuses to upgrade.
Adobe CC here I come, not just because of this Raw issue although I will upgrade myself one day soon, but I've seen so many brilliant tutorials using the latest from Adobe that I'm temped beyond reason. So watch thsi space.
Canon 70D set to completely to manual
F22 at 1/25th second, ISO 100
Sigma 10 / 20mm zoom at 14mm
White balance is set to the Kelvin scale and adjusted to suit, almost every ten minutes as the sun is fading fast!
Between 1/30th and 1/2 second DSLR cameras vibrate for a very short time as the mirror pops up and the first part of the shutter snaps across with 1/15th having the most shake.
To save my back muscles and to help reduce camera shake I'm using 'Live View', which also shows whether the colours, focus and composition are spot on.
Manfrotto tripods are among the world's best and is my favourite go-to tripod for the sort of semi low speed photography I am anticipating at this annual event.
Yes it is heavy but having spent a lot on camera, lens, travelling 45 miles to be here I'm not going to waste it all on a lightweight shaker. Besides, if it gets too heavy the Manfrotos are meaty enough to drag behind me on a length of string. (Joking!)
The times are gradually getting longer throughout the evening until the pink car below took 13 seconds to capture still at F22 and ISO 100.
Can't remember the Kelvin details exactly but the 'K' control definitely helps.
Lightroom 3.6 might be old hat now but it's so much quicker than putting all the Jpegs through Photoshop.
Did I say Jpegs then? I always use Jpegs, have done for the last ten years which amounts to over half a million photos.
However, with maximum quality in mind I decide to shoot in Raw + large Jpegs just in case.
Damned good job I did both as Lightroom 3.6 does not deal in Raw images from my Canon 70D and refuses to upgrade.
Adobe CC here I come, not just because of this Raw issue although I will upgrade myself one day soon, but I've seen so many brilliant tutorials using the latest from Adobe that I'm temped beyond reason. So watch thsi space.
Wednesday, 29 October 2014
How to shoot sports silhouettes with Keith Robins Photography.
A white backdrop is good, across the floor by ten feet is even better. A single softbox fires from one side at 45 degrees to the backdrop so the light bounces off harmlessly to the far side and doesn't weaken the blackness. Okay, so this is not exactly even lighting but I'm trying to demonstrate how to do these type of shots simpley, easy, cheaply.
This football shot takes more time than any of the others. Maybe Tann isn't a real sports fan at school - the ball shoots off at so many different angles. Yeah, yeah, I know I could photoshop the ball anywhere I like but that's not the idea here. These are all via Lightroom 3.6 which is old, cheap, simple etc.
Besides, my photoshop is on the blink, I will knuckle down to clearing out my Lightroom files as I'm suspecting the old Lightroom will vanish as soon as I sign up to Adobe CC and I'm not going to even think about what happens then. I never have managed to find where Lightroom saves when it backs up.
Okay, so decorating may not be strictly a sport but DIY is high on the list of popular hobbies along with gardening, fisning and photography, plus I have all the painting kit in my van.
Even the roller and the drill below are often in the van - I'm a builder / repairman.
I reckon a chair adds more impact than a traditional pair of steps, besides I don't have a pair in the van.
I hope you dodn't realize that Tann is adjusting a lighting stand, it should be a pipe, but hey, who's to know?
This climbing image really needs a rockface but my imagination is working overtime on this shoot due to a cappuccino being stronger than my normally drinking just hot water, sometimes with a tiny splash of orange squash.
Just to make thing more challenging I add a second flash with a grid to narrow the light down to just Tann's face, plus I shoot in colour as Tann, my model for the morning, wants to create a set of 'normal' photos for her Facebook page.
It was from these that the pure soot and whitewash silhouettes originate with the help of Lightroom.
Pushing the contrast way up, the brightness right up, blacks far over, plus an adjustment brush with plenty of contrast, etc. Oh, and saturation gets pushed down low as a little purple is creeping in here and there.
Creating these silhouettes has been a rewarding exercise alround and there are so many variants yet to shoot, but using the right lighting in the first place helps a lot in seeing what the camera sees, plus I definitely needed a little help from Lightroom and it's, 'Job done!'
A white backdrop is good, across the floor by ten feet is even better. A single softbox fires from one side at 45 degrees to the backdrop so the light bounces off harmlessly to the far side and doesn't weaken the blackness. Okay, so this is not exactly even lighting but I'm trying to demonstrate how to do these type of shots simpley, easy, cheaply.
This football shot takes more time than any of the others. Maybe Tann isn't a real sports fan at school - the ball shoots off at so many different angles. Yeah, yeah, I know I could photoshop the ball anywhere I like but that's not the idea here. These are all via Lightroom 3.6 which is old, cheap, simple etc.
Besides, my photoshop is on the blink, I will knuckle down to clearing out my Lightroom files as I'm suspecting the old Lightroom will vanish as soon as I sign up to Adobe CC and I'm not going to even think about what happens then. I never have managed to find where Lightroom saves when it backs up.
Okay, so decorating may not be strictly a sport but DIY is high on the list of popular hobbies along with gardening, fisning and photography, plus I have all the painting kit in my van.
Even the roller and the drill below are often in the van - I'm a builder / repairman.
I reckon a chair adds more impact than a traditional pair of steps, besides I don't have a pair in the van.
I hope you dodn't realize that Tann is adjusting a lighting stand, it should be a pipe, but hey, who's to know?
This climbing image really needs a rockface but my imagination is working overtime on this shoot due to a cappuccino being stronger than my normally drinking just hot water, sometimes with a tiny splash of orange squash.
Just to make thing more challenging I add a second flash with a grid to narrow the light down to just Tann's face, plus I shoot in colour as Tann, my model for the morning, wants to create a set of 'normal' photos for her Facebook page.
It was from these that the pure soot and whitewash silhouettes originate with the help of Lightroom.
Pushing the contrast way up, the brightness right up, blacks far over, plus an adjustment brush with plenty of contrast, etc. Oh, and saturation gets pushed down low as a little purple is creeping in here and there.
Creating these silhouettes has been a rewarding exercise alround and there are so many variants yet to shoot, but using the right lighting in the first place helps a lot in seeing what the camera sees, plus I definitely needed a little help from Lightroom and it's, 'Job done!'
Sunday, 9 March 2014
Is it me or are seaside photos fraught with accidents?
Last night it was my radio trigger which sank without a trace.
The lighting stand was in two feet of water plus waves rolling in at 4
second intervals about 10 to 12 inches high. No great shakes you say,
until an iShoot radio trigger slides off the hotshoe and drops into the
sea!! While i'm trying to regain my composure and my balance I am
watching the surface carefully looking for bubbles. If there's air
inside then that has to come out before the sea can get in.
Spotted!! Twenty or so tiny bubbles indicate exactly where the trigger
is. Roll up sleev, hold camera up away from the waves (yes I've been
there done that!) and plunge a hand downward, only there's a hole right
where the bubbles are.
I was tempted to shrug and accept the fate of
the fourth trigger within twelve months to become functionless but
another couple minutes grasping at the seabed and i'm shaking the water
and sand out of my tiny piece of kit.
Take out the batteries and put it in front of the hot air on the way home.
This morning I look inside to see all the salt caking over some vital
bit and decide to pop it in the sink for a wash and brush up. At the
moment I'm still waiting for the receiver electronics to dry out and
then I'll test it again (didn't work the first time I tried).
Out
with all the other broken triggers and a bunch of tools and proceeded to
repair / bodge three of the six into working items worthy of gracing a
Bronica camera bag (well almost). So I'm back up to five triggers now.
Later on around sunset last night I stumble right next to the sea wall
at Lyme Regis and my camera lens hits the stones rather hard. Luckily
only the filter edge was dented and scratched but the threads are okay.
Thank goodness I usually keep the filter attached, (I take it off when
shooting into the sun to cut down on flare).
Hotshoes coming adrift where the screws pull out of the plastic are the result of most common accidents. Triggers snapping in half is second and battteries leaking are third in line for why flashguns don't go off when expected. There is a fourth problem - the flash only work a fraction of the time. Putting a new CR23a battery into the transmitter usually cures that one.
Sunday, 12 May 2013
The great John Denton, master of flash, comes to the south coast on 20th May and I'm booked in for a full day on-location model shooting with him!!!!
John is a memeber of the SWPP, Society of Wedding and Portrait Photograpers, so every couple months there's a new lighting course with a top photographer.
With luck I'll be able to keep up with all the info and learning oportunities that John will be throwing at myself and the twelve or so other during this top of the range one day course. I've been a fan of Denton's portrait style for a number of years and this is going to be the highlight of my year.
ASAP I'll be posting up some of my results so you can see what I've learnt and how I coped with the pressure of being put on the spot with a top UK model, a location I've not previously sussed out, and lighting which I shall try to be prepared for but am not sure of - might be mine or could be John's ideas.
Really looking forward to this challenging day which every self-respecting portrait photographer should be scrambling to get onto - can't wait!!!!!
John is a memeber of the SWPP, Society of Wedding and Portrait Photograpers, so every couple months there's a new lighting course with a top photographer.
With luck I'll be able to keep up with all the info and learning oportunities that John will be throwing at myself and the twelve or so other during this top of the range one day course. I've been a fan of Denton's portrait style for a number of years and this is going to be the highlight of my year.
ASAP I'll be posting up some of my results so you can see what I've learnt and how I coped with the pressure of being put on the spot with a top UK model, a location I've not previously sussed out, and lighting which I shall try to be prepared for but am not sure of - might be mine or could be John's ideas.
Really looking forward to this challenging day which every self-respecting portrait photographer should be scrambling to get onto - can't wait!!!!!
Sunday, 13 January 2013
Flash Vs LED torch
A torch and LED lighting capture a part open book proving that low powered lights can yield amazing results.
Let's look at how substituting one of the light sources with a low powered flash will help us understand the relationship of continuous lighting with that of a flashgun, an understanding of which we might one day need while on a location portrait-photoshoot when we want to capture a lovely sunset as a background behind the subject.
A flashgun exposes our subject in around 1/1,000th of a second regardless of the shutter speed, (below the sync speed of 1/200th). Meanwhile, we are using those same shutter speeds to control the intensity of the LED light source - longer means brighter and shorter gives a darker image. You might or might not notice that the flash exposure never changed, but more of this a moment.
A typical closeup or table top still life scenario might be :- We need a good depth of focus for our subject and decide on F11. The LED block at twelve inches requires a shutter speed of 1 second. This is okay for the flash as that is all over and finished, as we know, in 1/1,000th - it doesn't matter that the shutter is still open so it can carry on capturing the LED lighting.
This means we could make the exposure time longer to effectively create more light from the LED's without effecting the flash exposure. This is a hint that flash and continuous lighting are governed via separate camera controls - flash with aperture and continuous light via shutter speed. For instance, a longer exposure would give us more time to move the LED light slowly around the subject and we could eliminate all shadows. I say slowly as the exposure is one second so each position of the light needs to be for one second otherwise that part of the overall exposure will be too dark. Moving it slowly will allow that part of the subject to look balanced, while a faster movement will under expose.
So it looks like speed of movement from the light source or shutter speed governs how intense the light is.
We could even leave the shutter open for thirty seconds, which most digital cameras are capable of, and use the LED on/off swith to make our exposure of one second. This is assuming we are in a dark room, shed, skittle alley, etc.
We might also, during the same exposure, switch the LED back on with it in a different position and illuminate the shadow side of your subject from just a little bit further away thereby creating a softer shadow and we start to appreciate what lighting ratios are all about.
Meanwhile, our flashgun could also be moved, closer for more light or further away for less. We can also vary the softness of a flash by keeping to the same distance, doubling the output and bouncing it into a handheld reflector, or off a white wall, piece of card, even a sheet of newspaper, or the inside of a helium party balloon which is a matt finish alluminium and makes a superb reflector when taped over a piece of cardboard.
Same as the LED the flash can be moved and exposed several times during a thirty second exposure. Fire it once straight on from the right for a sharp shadow, then move it to the left side at the same distance but this time bounce it into a reflector and the shadows become softer by between one stop and two stops.
By now it should have become clear that shutter speeds control continuous lighting while aperture controls the flash. What else can control the flashgun? Distance, closer for more light, further away for less intensity. Then there are all the different powers from full whack all the way down to 1/128th power.
Another consideration is the aperture of F11, the higher the number the lower the lighting power from both continuous light and flashgun, but is going to throw a spanner in the works if we want to stick with the F11 we originally wanted for our required depth of focus.
A lower aperture such as F5.6 means we have less time to play around with our lighting, or does it? No, we merely shift our lights to exactly double the distance and we are right back to using all the timings and scenarios above. There is a complicated formulea which we don't neeed to confuse ourselves with called inverse square law but thankfully the way F numbers are worked out means we get exactly the same lighting power by doubling the distance and dropping two stops.
Hope your not too confused but my Yeo Photo Group camera club will be running through this several times on Tuesday evenings and will be using this basic information many times at during the next twelve months.
Let's look at how substituting one of the light sources with a low powered flash will help us understand the relationship of continuous lighting with that of a flashgun, an understanding of which we might one day need while on a location portrait-photoshoot when we want to capture a lovely sunset as a background behind the subject.
A flashgun exposes our subject in around 1/1,000th of a second regardless of the shutter speed, (below the sync speed of 1/200th). Meanwhile, we are using those same shutter speeds to control the intensity of the LED light source - longer means brighter and shorter gives a darker image. You might or might not notice that the flash exposure never changed, but more of this a moment.
A typical closeup or table top still life scenario might be :- We need a good depth of focus for our subject and decide on F11. The LED block at twelve inches requires a shutter speed of 1 second. This is okay for the flash as that is all over and finished, as we know, in 1/1,000th - it doesn't matter that the shutter is still open so it can carry on capturing the LED lighting.
This means we could make the exposure time longer to effectively create more light from the LED's without effecting the flash exposure. This is a hint that flash and continuous lighting are governed via separate camera controls - flash with aperture and continuous light via shutter speed. For instance, a longer exposure would give us more time to move the LED light slowly around the subject and we could eliminate all shadows. I say slowly as the exposure is one second so each position of the light needs to be for one second otherwise that part of the overall exposure will be too dark. Moving it slowly will allow that part of the subject to look balanced, while a faster movement will under expose.
So it looks like speed of movement from the light source or shutter speed governs how intense the light is.
We could even leave the shutter open for thirty seconds, which most digital cameras are capable of, and use the LED on/off swith to make our exposure of one second. This is assuming we are in a dark room, shed, skittle alley, etc.
We might also, during the same exposure, switch the LED back on with it in a different position and illuminate the shadow side of your subject from just a little bit further away thereby creating a softer shadow and we start to appreciate what lighting ratios are all about.
Meanwhile, our flashgun could also be moved, closer for more light or further away for less. We can also vary the softness of a flash by keeping to the same distance, doubling the output and bouncing it into a handheld reflector, or off a white wall, piece of card, even a sheet of newspaper, or the inside of a helium party balloon which is a matt finish alluminium and makes a superb reflector when taped over a piece of cardboard.
Same as the LED the flash can be moved and exposed several times during a thirty second exposure. Fire it once straight on from the right for a sharp shadow, then move it to the left side at the same distance but this time bounce it into a reflector and the shadows become softer by between one stop and two stops.
By now it should have become clear that shutter speeds control continuous lighting while aperture controls the flash. What else can control the flashgun? Distance, closer for more light, further away for less intensity. Then there are all the different powers from full whack all the way down to 1/128th power.
Another consideration is the aperture of F11, the higher the number the lower the lighting power from both continuous light and flashgun, but is going to throw a spanner in the works if we want to stick with the F11 we originally wanted for our required depth of focus.
A lower aperture such as F5.6 means we have less time to play around with our lighting, or does it? No, we merely shift our lights to exactly double the distance and we are right back to using all the timings and scenarios above. There is a complicated formulea which we don't neeed to confuse ourselves with called inverse square law but thankfully the way F numbers are worked out means we get exactly the same lighting power by doubling the distance and dropping two stops.
Hope your not too confused but my Yeo Photo Group camera club will be running through this several times on Tuesday evenings and will be using this basic information many times at during the next twelve months.
Sunday, 9 December 2012
Wow, what has Blogger done to their site since I was last on the scene? It's a work of art now to get up the 'New post' box.
Been so busy doing plumbing and building repairs , yet strangely I've also managed to squeeze in even more photography than ever before with around 4 to 8 photo shoots per week. Most of these have been portrait on location shoots in the woods, by the sea, on hill tops and up to my knees in rivers, plus several portrait sessions in the sea with waves lapping at my pockets. My flashguns and stands have always been with me as my passion for great lighting knows no bounds, even in the surf.
Tonii at WestBay obviously used no flash at all but this is one of the extremely rare moments when I used pure natural light.
Exposing for the brightest part of the sky involves noting the auto exposure settings and then closing down two stops as a starting point. Usually I leave the white balance set to 'Flash' as I prefer the warmer tones. Same too with night photography when I want the tungsten street lights to resemble tugnsten street lights.
Now let's have a look at Tonii in this dis-used wartime building with its gorgeous grafitti. Taken with two flashes, one front and back, with Tonii sandwiched between. I call this sandwich lighting for good reason, preferably with a softbox on the nearest flash while the far light has no modifier and is often wearing a DIY grid.
I quite liked the effect of flare from the rim light and decided to stick with it for the rest of this part of the shoot.
Two softboxes help blend the warm daylight into this image with almost no visible cut off point between the two light sources.
Tonii is so patient and is helpful beyond measure, Although she is never backward in saying if she doesn't like a particular shot, which gets deleted there and then.
So yes, I do show my models / helpers the images as they gradually develope into the finshed product.
The church is run byMichael, a good friend of mine, who says we can borrow it any time he's not using it. Must remember to give him a copy of some of the better images.
In this shot of Danii leaping over a log in a local forest I wanted to keep the daylight as a blur, plus create a blur behind her. The choices are either go with a stanionary camera on a tripod and catch the blur of white material streaming out behind Danii and freeze her with second curtain flash. Or, I pan with her and get streaky daylight.
After a couple shots of each category an idea sprang to mind - what if I could manage both trains of thought in one shot. By arranging for Danii to be running towards the darker area and panning with her I could turn the camera faster, in the same direction, after the flash had gone off in first curtain sync. I hasten to add that I was using about 1/10 of a second. Also, by the third image, I realise that although I'm turning the camera faster I'm panning it a little too fast. Because the flash is the main illumination here then Danii is less likely to record against the blackness. Her front foot is moving fast enough not to record as a great deal of blur due to the flash, although I did have to go into Photoshop and take out a small amount of blur in that area.
Been so busy doing plumbing and building repairs , yet strangely I've also managed to squeeze in even more photography than ever before with around 4 to 8 photo shoots per week. Most of these have been portrait on location shoots in the woods, by the sea, on hill tops and up to my knees in rivers, plus several portrait sessions in the sea with waves lapping at my pockets. My flashguns and stands have always been with me as my passion for great lighting knows no bounds, even in the surf.
Tonii at WestBay obviously used no flash at all but this is one of the extremely rare moments when I used pure natural light.
Exposing for the brightest part of the sky involves noting the auto exposure settings and then closing down two stops as a starting point. Usually I leave the white balance set to 'Flash' as I prefer the warmer tones. Same too with night photography when I want the tungsten street lights to resemble tugnsten street lights.
Now let's have a look at Tonii in this dis-used wartime building with its gorgeous grafitti. Taken with two flashes, one front and back, with Tonii sandwiched between. I call this sandwich lighting for good reason, preferably with a softbox on the nearest flash while the far light has no modifier and is often wearing a DIY grid.
I quite liked the effect of flare from the rim light and decided to stick with it for the rest of this part of the shoot.
Two softboxes help blend the warm daylight into this image with almost no visible cut off point between the two light sources.
Tonii is so patient and is helpful beyond measure, Although she is never backward in saying if she doesn't like a particular shot, which gets deleted there and then.
So yes, I do show my models / helpers the images as they gradually develope into the finshed product.
The church is run byMichael, a good friend of mine, who says we can borrow it any time he's not using it. Must remember to give him a copy of some of the better images.
In this shot of Danii leaping over a log in a local forest I wanted to keep the daylight as a blur, plus create a blur behind her. The choices are either go with a stanionary camera on a tripod and catch the blur of white material streaming out behind Danii and freeze her with second curtain flash. Or, I pan with her and get streaky daylight.
After a couple shots of each category an idea sprang to mind - what if I could manage both trains of thought in one shot. By arranging for Danii to be running towards the darker area and panning with her I could turn the camera faster, in the same direction, after the flash had gone off in first curtain sync. I hasten to add that I was using about 1/10 of a second. Also, by the third image, I realise that although I'm turning the camera faster I'm panning it a little too fast. Because the flash is the main illumination here then Danii is less likely to record against the blackness. Her front foot is moving fast enough not to record as a great deal of blur due to the flash, although I did have to go into Photoshop and take out a small amount of blur in that area.
Saturday, 28 July 2012
Latest news from Keith Robins
It's been ages since my last blog post here but Keith Robins Photography is still around and busier than ever. For instance, I recently surprised myself and managed ten on-location portait photoshoots in eight days besides working a fifty hour week in my plumbing business.
Now I've turned 67 it should be time to relax and put my feet up. But, as luck would have it, my long term hobby is photographing young ladies so I've brushed the dust off my camera, charged up a few batteries and taken a few on-location photo trips into the countrtside. River shoots seem to feature quite highly in the requests from young feminine beauties closely followed by 'on-the-rocks' at the seaside. If this is what retirement is all about - bring it on!
I'm not sure how or why but Facebook was kind enough to give me a private page plus a business page, which I don't mind at all as it gives me a couple of options when I upload the results from these exciting photo sessions. Okay, so Facebook resizes all the images for me automatically, which helps make them less desirable to rip-off merchants, plus there is plenty of space for loads and loads of albums. This in turn has attracted quite a few viewers and resulted in new models contacting me ref photoshoots.
I normally work on a TFCD basis which means I give some of my time and skill, the model gives her time and good looks. The model gets a set of CD images and we both end up improving our portfolios.
Now, this might sound as if I'm losing out on a load of cash. But actually it's the very opposite - I'm saving myself money! What's happening is that I am now meeting some really attractive models, my persona and techniques have changed for the better. Plus, I consider myself a much better photographer and my skills level has shot through the roof.
I'm now in a position where I could start charging for my skills because I can physically prove that I'm the photographer who is capable of producing stunning results. Similar in a way, I suppose, to a brilliant violinist going on the X factor and winning and all his neighbours saying, 'Well I didn't know he could play like that!'
You have to show what you can do, how good you are and only then will Joe Public beat a path to your door. I look on Facebook as being my shop window, plus they even tell friends of friends how good you are - and it's all free!!!!
I'm gradually putting a two or three results from each of my most recent photography shoots, along with a write-up, on to my Facebook page at:- www.facebook.com/keithrobinsphotography
I also run a blog based website at:- http://www.keithrobinsphotography.co.uk
Meanwhile, seeing as I'm now drawing a pension and my customers won't let me retire in peace, what's the point in charging loads of money and then paying income tax on all of it? Or am I sonehow missing the point?
Now I've turned 67 it should be time to relax and put my feet up. But, as luck would have it, my long term hobby is photographing young ladies so I've brushed the dust off my camera, charged up a few batteries and taken a few on-location photo trips into the countrtside. River shoots seem to feature quite highly in the requests from young feminine beauties closely followed by 'on-the-rocks' at the seaside. If this is what retirement is all about - bring it on!
I'm not sure how or why but Facebook was kind enough to give me a private page plus a business page, which I don't mind at all as it gives me a couple of options when I upload the results from these exciting photo sessions. Okay, so Facebook resizes all the images for me automatically, which helps make them less desirable to rip-off merchants, plus there is plenty of space for loads and loads of albums. This in turn has attracted quite a few viewers and resulted in new models contacting me ref photoshoots.
I normally work on a TFCD basis which means I give some of my time and skill, the model gives her time and good looks. The model gets a set of CD images and we both end up improving our portfolios.
Now, this might sound as if I'm losing out on a load of cash. But actually it's the very opposite - I'm saving myself money! What's happening is that I am now meeting some really attractive models, my persona and techniques have changed for the better. Plus, I consider myself a much better photographer and my skills level has shot through the roof.
I'm now in a position where I could start charging for my skills because I can physically prove that I'm the photographer who is capable of producing stunning results. Similar in a way, I suppose, to a brilliant violinist going on the X factor and winning and all his neighbours saying, 'Well I didn't know he could play like that!'
You have to show what you can do, how good you are and only then will Joe Public beat a path to your door. I look on Facebook as being my shop window, plus they even tell friends of friends how good you are - and it's all free!!!!
I'm gradually putting a two or three results from each of my most recent photography shoots, along with a write-up, on to my Facebook page at:- www.facebook.com/keithrobinsphotography
I also run a blog based website at:- http://www.keithrobinsphotography.co.uk
Meanwhile, seeing as I'm now drawing a pension and my customers won't let me retire in peace, what's the point in charging loads of money and then paying income tax on all of it? Or am I sonehow missing the point?
Tuesday, 29 November 2011
Just been on a 'Subtraction of Light' course with Mark Cleghorn of PhotoTraining4U fame in Cardiff.
Seems like the addition of flash is not quite as necessary as I'd previously thought.
In fact, during the five day course we were starting at 6am and photographing with extended exposures of up to two minutes. On a pier in low lying mist by 10am and then later we went under the pier to discover the equivalent of studio lighting!
Mark's 'Subtraction of Light' course has changed my whole outlook on how I take portraits with the purchase of a Canon 85mm F1.8 lens. I've also begun using the 'Picture Style' modes on my Canon 5D with black and white plus a red filter being my favourite.
Candid photography has never been one of my favourite pastimes, but it is growing on me. Street portraits however, turned ot to be far more rewarding than anything I've previouly tackled with many new contacts each time I take to the streets.
Portraits in the woods now makes me look for 'window light' and a reflector is higher on my list of accessories than a tripod ever was.
But don't worry I'm going to forgo the benefits of using a flashgun.
I'll try to keep you posted on a more regular basis with plenty of results form my YeoPhotoGroup course which now takes place on a Tuesday evening. This is a free range group with no charges, no officialdom and no real rules apart from the basis of, 'We all help each other to enjoy our photography and don't give any negative comments'.
We now have a facebook area and regularly post results, ideas, and hints.
Keith.
Seems like the addition of flash is not quite as necessary as I'd previously thought.
In fact, during the five day course we were starting at 6am and photographing with extended exposures of up to two minutes. On a pier in low lying mist by 10am and then later we went under the pier to discover the equivalent of studio lighting!
Mark's 'Subtraction of Light' course has changed my whole outlook on how I take portraits with the purchase of a Canon 85mm F1.8 lens. I've also begun using the 'Picture Style' modes on my Canon 5D with black and white plus a red filter being my favourite.
Candid photography has never been one of my favourite pastimes, but it is growing on me. Street portraits however, turned ot to be far more rewarding than anything I've previouly tackled with many new contacts each time I take to the streets.
Portraits in the woods now makes me look for 'window light' and a reflector is higher on my list of accessories than a tripod ever was.
But don't worry I'm going to forgo the benefits of using a flashgun.
I'll try to keep you posted on a more regular basis with plenty of results form my YeoPhotoGroup course which now takes place on a Tuesday evening. This is a free range group with no charges, no officialdom and no real rules apart from the basis of, 'We all help each other to enjoy our photography and don't give any negative comments'.
We now have a facebook area and regularly post results, ideas, and hints.
Keith.
Monday, 2 May 2011
Miniscule portrait studio at 1.5 m by 1 metre!A narrow shop doorway, model four feet away and a single off-camera flashgun bounced off a four inch wide doorframe is all Keith Robins Photography needs to create a superb portrait.
Okay so there is a bit of help from the sun which illuminates Lola's left cheek via the white wall outside. For some of these photos I use my Canon 580 EX with the head reversed and bouncing it off a white tee shirt to my left. The flash is set on ETTL while the camera stays on manual, enabling me to control the daylight to a precise exposure.
Getting Lola to look towards the somewhat darker shop interior helps to open up her eyes and as we all know, it's the eyes that can make or break a good portrait.
I came across Lola a week ago via 'Model Mayhem', a sort of online modeling agency where you sign up, wait for approval and eventually if they think you're good enough you can send out friend requests followed by email contacts with the models where MM act as intermediaries, a sort of buffer zone.Lola is a newbie to the site as a model but I've had nearly forty years behind my camera as a portrait photographer and i've decided that her portfolio needs a boost, come to think of it so does mine! Besides, not only do I need the practice but, I can't remember ever having photographed a girl with such beautiful red hair or such incredible blue eyes. Mostly, though, I could see the possibilities of some amazing photos with Lola and on this count I think I am definitely about to be proved correct.

We arrange to meet at a carpark in Glastonbury on May 1st and blow me most of the roads are closed due to a series of bank holiday fun runs, the carpark is full but I somehow manage to squeeze in. Lola's mum has come along to help hold one of the flashguns as I can only carry one lighting stand along with all the other stuff us photographers consider important - so why do we never use it all?
I often carry two large bags and pull a kitchen waste bin on a shopping trolley full of lighting stands, brollies, reflectors and tripod, but this time it is just a bagful of four flashes, stand adaptors and triggers.
'Proper Job' supermarket carpark provides a small area of shade under a tree set in the pavement which I use to keep the brilliant sun off Lola's gorgeous red hair - I wanted to create my own strobist lighting arrangements, my own sunlight if you like.One stand, a Vivitar 285 into a small brolly, a second 285 is held by mum replicated the sun to great effect. Both guns are firing via cheapo radio triggers from China at £60 for a set of three recievers and one transmitter. The benefits are that Lola's blue eyes opened up as she looked into the shade. What appears to be sunlight shining on Lola's cheek is really a Vivitar at 1/2 power, but without a modifier it resembles direct sunlight. The second 285 is bouncing into the small brolly also set to 1/2 power, but due to it bouncing into a brolly this is reduced to around 1/4 power and the biggest benefit is that it's really soft due to the close proximity - about three feet.
You wouldn't think that a carpark would make any sort of decent backdrop but it does. Not having access to a studio should not put you off taking beautiful portraits like these, it is possible almost anywhere to create a work of art using flag lights. Strobism rules!
Then we move on to a narrow shop doorway where Lola faces into the fairly dark interior with a weedy backyard and a whole mess of rainwater pipes in the background lit by sunlight.Okay, so I didn't stay true strobist with the Vivtars for this part of the photoshoot as I want to push my understanding of the capabilities of Canon ETTL and whether I can still influence this modern automatic lighting technology, or, does it take over and mess up everything creative. To which the answer is - without my strobist knowledge of how to juggle exposure controls these photos of Lola will suffer big time.
Canon's interactive ETTL with more than one flash is now moving further down the list of things to absorb my precious time!
During the two hour shoot I take 115 photos, (eighty-five after editing), which Lola will get on a CD to go on her Facebook page, also on to her MM portfolio. I'm only too pleased to help this delightful young lady on her way as a model who is a joy to work with.
Will I use Model Mayhem again? Yes, without a doubt! Although it's a rather long winded method of contacting suitable models but it's for their protection and I can see why it has to be this way.
Will I be photographing Lola again? Yes, most definitely, can't wait!!!!
Subscribe to:
Posts (Atom)