Saturday, 19 December 2009

Sharpening images in Elements 4 without halos. Keith Robins Photography has written a previous post referring to a rather unusual method of sharpening in Adobe CS3, but as most photographers seem to prefer sticking to the basic Elements I thought I'd try an alternative technique using Elements 4 with very similar results. Go up to Image in the top toolbar and choose Greyscale and your image turns black and white.
Now go to Filter - Sharpen - Unsharp Mask and move the percent slider up to 300%, yes really! The Radius stays around 0.8 and the Treshhold remains at Zero.
Save As under a new name so that you can reopen the same image from your files and folders, but this time you're going to keep it as a coloured photo.
Use the Move tool and hold down Shift while you drag the black and white picture into the colour image and then select the Overlay mode for this new top layer.
The colour of the lower layer shows through the black and white sharpness of the upper layer.
By clicking on each photo in turn you should be able to see which of these images has been sharpened.

Wednesday, 16 December 2009

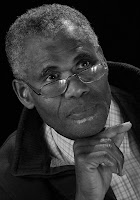
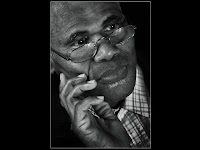
Keith Robins Photography tries sharpening with a big difference! Black and white photos of men can stand a lot of really gritty sharpening. I absolutely love these B andW pictures of Ollie, especially the biting sharpness. Ollie was a former member of Yeovil Camera Club back in the 7o's and willing posed for us.
I tried using unsharp mask but wasn't keen on the resulting halos and colour fringing often associated with normal everyday sharpening.
I vaguely remembered reading an article on the web last year suggesting Lab Colour mode as an alternative method of sharpening - so I gave it a go.
First thing is swap to Lab Colour mode, which is found under Image in the top toolbar.
Next, click on Channels in the Layers palette and select the Lightness layer. The other three layers will turn off when you do this. Find the normal everyday Unsharp Mask and whizz it up to 300% - don't worry it'll turn out just fine! (Obviously this 300% is not set in stone so just use that as a starting point, I have used as much as 500% with extremely good results.)
In the Radius box just beneath I went for 0.8 pixels and the bottom box, Threshold, was left at zero - click OK.
Click on the top layer to open up all the other channels again, then go back to Image and swap back into RGB mode. Select Layers as opposed to Channels and you're back in the world of good old layers which we all known and love.

In case you haven't realised I'm a supporter of Jpegs - I have tried RAW but found it decidedly soft and absolutely everything needed working on wityh evry single image - time wasting! I'll continue to let the camera do the donkey work and I'm not tempted to bother trying RAW again, thank you very much. I take around 400 pictures a week, mostly experimenting with lighting and unusual effects and I want to see them right away, full screen.
Besides, I can still use all the Adobe Camera Raw tweaks on my Jpegs prior to opening them in Photoshop. However, if you want to prove me wrong - go on then, I challenge you to make a better picture via Raw in the camera!
After sharpening these photos were changed to black and white using a Black And White adjustment layer in CS3 and moving the red channel slightly to the right and the yellow channel a little bit further. This lightened up the shadow detail in Ollie's features without blowing the brightness of his shirt collar.
I guess one day I'll get used to how Actions operate and that'll speed things up enormously, but for now I enjoy using Photoshop so I'll plod along slowly. Even so, each of these images took less than ten minutes to start looking really good, then I started playing around with oval selections, inverting them, feathering to 130 pixels and finally using another adjustment layer, Levels this time, to introduce a little darkness around the outer edges.
I also use the same 130 pixel feather to make a selection and then press Control + M to bring up the Curves adjustment box and then drag the line down a bit to darken, make another selction and use Curves again to make that selection slightly lighter. This seems to work in a more pleasing manner than using the Dodge tool or the Burn tool.

There were two lights used here, one via a shoot-thro brolly and the other bounced into a silver sunshield. Originally designed for a car windscreen on sunny days this £4 makeshift reflector is now supported on a couple lengths of plumbers piping. (See a previous post for info on how to make this easily assembled gadget.)
Ialso used a black blanket background supported on plumbers waste pipe and a short length of plastic guttering fixed atop a single lighting stand. I designed that litle gadget over twenty years ago and still find it extremely quick and simple to erect.
The tip of the brolly was less than eighteen inches from Ollie's nose and to camera left, while the reflector was about two feet away to camera right with the flash only just out of camera view. These lights are ancient and rather warm in tone so I either use a DIY colour balance card, or carry out a custom white balance which is easy on the Canon camera, plus just a little tweak in Adobe Camera Raw before opening up into CS3.

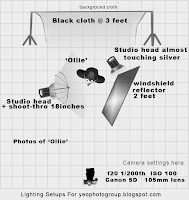
A setup like this uses very little space and most living rooms / lounges / or a large kitchen can be utilised. The studio flashes used here on Ollie are thirty years old and have no power controls, so my alternative set of Elichrom D-Lite 200watt would have been an absolute dream to use.
I ought really to sell those old lights on EBay but hey, old habits die hard. Alternatively, I could have used a couple of old hotshoe flashes with equally good effect. What I'm trying to say is, use whatever lighting you have lying around and instead spend your money on a better lens, or some versatile software such as CS3, or maybe a more patient or attractive model.
Incidentally, I recently spent a couple of hours making up a whole arsenal of tiny diagrams to suit my own lighting needs. These are saved as a huge number of layers and kept as a PSD file, which enables me to move them around, rotate, turn off the ones not needed and flipping over those facing the wrong way. I love Photoshop!!!

Saturday, 31 October 2009

One radio transmitter and three triggers for £40. What a bargain for Keith Robins Photography!
Amazon is the place to visit for a fast efficient service. I ordered the triggers on Wednesday and, even though there was a Post Office strike in action, the packet was delivered on Friday. the Vivitar 285HV flashgun which I ordered the same day came a couple days later, well packed and in good nick. Thank you to the postmen for what I term a pretty good service in your hour of strife.
How do the triggers handle in use? Brilliantly!
The normal place for a radio transmitter is in the hotshoe along with a trigger mounted beneath a remote flashgun - this arrangement fired one of my Vivitar 285HV's at up to 50 metres, a lot further than the advertised 30 mtrs. I was more than pleased with this result.

For the next test I added an optical slave into the chain, just to explore the limitations. One Vivitar on the camera, then at 30 metres distance the radio transmitter was slotted into an £8 optical slave, a second 285HV was then slotted into one of the three triggers and placed an additional 30 metres from camera. The equipment all works together just fine, which is fantastic!

Next, I wanted to know whether a flash in ETTL mode would operate the remote flash. I placed a Canon 550EX in ETTL mode on top of a Canon 5D, which in turn was set to manual. The optical slave was connected directly to the Vivitar 285H. This system failed miserably!
A flashgun in ETTL mode, or a pop-up flash, sends out a small pre-flash before the shutter opens to calculate the strength of flash exposure needed to light the main subject. Of course this pre-flash will also set off the remote flashgun operated via an optical slave unit before the shutter is open. When the main light fires a few milliseconds later it's too late for your remote flash as it has already gone off and is still in the process of recharging.

Maybe this is why some photographers, new to the world of flashguns can easily be lead into thinking that multiple flash is beyond them, especially as their images consistently portray dead flat lighting from the on-camera flash.

Fear not, there is a way around this most irksome problem!
You may have noticed that when taking a photo a half press on the shutter button causes focusing / exposure info to pop up on screen for about 15 seconds.
The trick with using an ETTL flash as a master to fire remote flashes on radio triggers is to half press the shutter button to bring up this information, then press the star button which fires the tiny pre-flash along with the remote slave flash. Meanwhile the shutter is still closed.
Now wait about 10 seconds, but no longer than 14 seconds, before fully pressing the shutter button to take the photo proper. If you're using newish batteries this should be long enough for the remote flash to recharge and both guns will now fire while the shutter is open and give whatever power you have set on them.

However, when the on-camera flash is set to manual there is no pre-flash and both guns will fire as one light without any trouble.
I also tried using aperture priority and it worked great.
Carrying out the same test using shutter priority I found that the Canon 5D limited the speed to 1/200th with the end result coming out spot on.
All this exploration took several hours and I'll need to repeat this type of testing a few more times before it sinks in - remember I'm new to ETTL and the Canon 5D as maual flash has been my staple diet since the early seventies.
Hope this is some help in your flahs photography - Keith Robins.

Sunday, 13 September 2009

Studio flash outdoors - at night! Okay so maybe it's been done before via an extension lead. However, Keith Robins Photography is adventurous enough to investigate the great outdoors as a backdrop and discovered that full length portraits do not need rolls of expensive background cloth / paper. Nor is there any need to flag any of the flash heads to prevent stray light illuminating those annoying creases which seem to occur in even the smoothest and blackest of background material.

In a few of the recent posts of YeoPhotoGroup, an off-shoot of Keith Robins Photography, you may have noticed us using a generator to power a pair of Elinchrom D-Lite 200's. Handling that heavy beast of a generator took two men to carry it plus two more to carry our camera gear and all the other boxes and bags of lights, stands, reflectors, modifiers, softboxes and assorted cables necessary to operate an outdoor studio.
Eventually, in a rash spur of the moment decision, I splashed out on a caravan inverter plus a new 12 volt 45 amp battery for my works plumbing van meaning there is now a spare battery in fairly good nick going spare. We can now operate two powerful studio lights from a small two wheeled shopping trolley containing this make-shift 230volt power supply.

Elinchroms are renowned for their 0.7 second recycling time which allows you to capture that fleeting expression of relief just moments after the shutter has fired which is when some models appear to briefly relax during the often daunting task of posing for the camera. During this two hour bridal shoot the recycling time for our D-Lite 200's remained very close to manufacturers specs and never went once over two seconds. An additional benefit is that once the really short time the lights take to recycle, the drain on the battery drops to such a minimal amount that it would probably last a whole weekend before the old van battery needs recharging.


In the first image here, Hannah is sat on a plastic sheet to keep her dress clean. A softbox front left and quite close created a soft main light and another Elinchrom with an alloy reflector lit the bushes behind her. Grace joined Hannah for the second and third pictures and revealed the difference our lights made to the texture of their lovely dresses. A silvered sun shield from a car windscreen mounted on a framework of plumbers 15mm copper pipe helped illuminate the shadows on the right. (More details on this DIY gadget in a later post)
Using 1/200th of a second shutter speed caused the background of Sydney Gardens in Yeovil to go black, while f11 at ISO 200 controlled the lights. All this was between 8pm and 9pm on 9th September, hence the lack of available light.
Our next challenge is to get a little more ambient light into the background, probably a seaside sunset along with a striking silhouette.
Then it'll be a portrait session with a firework display going on behind, okay so we could handle either of these tasks in Photoshop but where's the lighting challenge in that? We'll probably revert to our hotshoe flashguns for this one although I am very tempted by the much stronger Elinchroms which can handle a softbox or a large brolly without losing too much light.

Sunday, 6 September 2009

Hand held fairground night-time shots are nothing new for Keith Robins Photography, but now we're trying the same technique with the addition of a flash.
Camera settings for these shots are half a second exposure at f5.6, 100 ISO and my motorcycle battery powered Vivitar 285 HV on 1/16th power. I asked Grace to stand about six feet in front of me with the brightly lit fairground ride another twenty feet beyond and hand-held my Canon 400D.
I've visited the Great Dorset Steam Fair on many occasions over the last thirty years but only ever used flash successfully back in the seventies on slide film.
Now, with digital you'll be thinking that things are a lot easier - not so! When you love pushing the boundaries of flash photography nothing is easy, or is it? I practised with a flash plus a small twisting curl of the camera body in the first image, then used the same settings for the remaining images which gave me time for a flash plus zoom (the second image).

For the third image there was plenty of time to wave the camera in a small semi-circle without a flash.
Although I did have a Manfrotto tripod with me I just had to try this little experiment without it. Besides my tripod was being used by another member of my little group who had accidentally left his at home.
On the third image I managed to carry out all three manoeuvres while the shutter was still on half a second.

This final image shows Grace lit by 1/16th powered flash quickly followed by zooming the lens towards the telephoto end and tilting the camera slightly downward. Okay, so it took a few attempts to get the fourth shot but the final result works for me and to hear Grace's gasp of astonishment when she saw it, that was reward enough.
Next challenge for YeoPhotoGroup members is a gritty urban portrait using both my Elichrom D-Lite 200 studio lights on a single 12 volt battery. Yes, of course I've tried this rather extreme approach - it works fine - he said with fingers crossed. Look up a new post in a week or two to see how we get on with what are basically indoor lights in an outdoor environment.
http://www.keithrobinsphotography.co.uk
Flash and blur in the same shot! I said it was possible, but we did take over an hour to perfect it. Second curtain flash was already agreed long before we arrived on site, although why my Canon remains fixed in the first curtain mode regardless of menu settings does baffle me.
With a gale blowing like a demon we were on top of Hamhill frantically holding onto my Elinchrome D-Lite 200's. The softboxes nearly blew away, the rainclouds threatened but the wet stuff held back just for us.
We got beeped at by grinning motorists and Nicki received a quiet yet complimentary wolfwhistle. Meanwhile the shots mounted up as we struggled with shutter speed and panning techniques until Kelv's preview screen produced this super picture with the elusive blur.
1/20th of a second at f11 on 200 ISO - Fantastic! I've even framed it in my excitement, plus I have added a little escapism for the front wheel.

Now I wanted just that little bit extra umph. Lifting the D-Lite head off the lighting stand, which was tied to a 'No Waiting' sign to prevent the wind whisking it away, I then mounted it on the end of a decorators extending pole . I managed to hold the light with its dished reflector about six feet above Nicki's head and another six feet in front.

At some twelve feet long the unwieldy pole proved quite a handful, even though the flashhead weighs next to nothing it was over ten feet away from my hand and being whipped about by a gusting wind.
After twenty attempts we managed to finally get a natural looking background blur and becoming frustrated with trying the judge speeds and distances with one second shutter speed in second curtain flash mode
We ended this challenging shoot in damp darkness at around 9pm and were glad of our yellow safety vests which kept the traffic at bay.
I am definitely more than happy with these great results and am now busy planning the next challenge which is a flash lit subject, plus movement of some sort of ambient light or available lights in the background. Maybe the Great Dorset Steam Fair will help shed some suitable lighting. Keith (Strobist) Robins

Sunday, 16 August 2009

Elite Junior Triathlete Nicola Morgan looks fantastic here, almost as good as in real life. So much confidence in one so young!
As leading light of YeophotoGroup I was originally thinking of using hotshoe flashguns for this shoot, but I'm glad now that we went for the Elinchrom studio flashheads instead.

Although it's extremely heavy the 2.8 Kwatt generator was also a good move. With hardly a break in the rythm it kept up with the Elinchrom's power demanding 0.7 of a second recycling times for nearly two hours of solid shooting.
With the wind picking up part way through the shoot there were a few time when I was glad of the milk carton counter weights keeping the lighting stands stable. Trevor suggested sand as ballast as water could leak away in transit and leave us without the safeguard of stability for our delicate lights.
Even after years of using high shutter speeds along with fairly high apertures to make the sky dark I never cease to be amazed at just how creative photography can be when using several flashes at an angle to the camera.
The choices of whether to use hotshoe or studio flash depended on the light in an early evening sky, would it be too strong and overbearing in its intensity.

You can't argue with f 16 as a means of keeping that bright sky under control. The pictures below demonstrate the point perfectly, although some would say that we've gone way over the top and I've made it too dark. My response is - show me how you can improve on these shots and I'll listen, maybe I'll even learn something new. I do like to push the boundaries though as the limits are.... what exactly???


Meanwhile, I love the high contrast between Nicola and clouds and know for sure that next time I'm on a serious shoot I want studio flash, I want great backgrounds, texture, vibrance, correct skin colour and above I want eye-popping pictures.
Many thanks to Crusader Corperate Workwear of Lufton Trading Estate, Yeovil for printing these Hi-Vis vests which make us look so professional and dedicated. Also many thanks to Nicola and her dad for their time and effort to help all of us achieve a most exciting evening. Hope you like the pictures Nicki and best of luck on your next Triathlete event.

Can't wait until the next shoot as I want to use floodlights on the background so that with a careful chosen shutter speed we'll get blur. Half the fun of photography is visualisation and then planning. The second half is adapting your plans as the situation changes and new challenges arise. Try to be prepared with an alternative method of lighting up your sleeve, just in case the genny won't start, the lights fail, a fuse blows.
Keith (Strobist) Robins.